How to Install Rancher Desktop on Linux, macOS and Windows
What is Rancher Desktop #
Rancher Desktop, from SUSE, is a free and open source (Apache 2.0) desktop application for macOS, Windows and Linux that gives you a container engine and a local Kubernetes cluster. It is a popular alternative to Docker Desktop because it has no per-user license: it is free for personal and commercial use.
It bundles everything you need: the container engine (containerd or dockerd), the docker and nerdctl command line tools, Docker Compose, kubectl, helm and a K3s Kubernetes cluster that you can switch on or off.
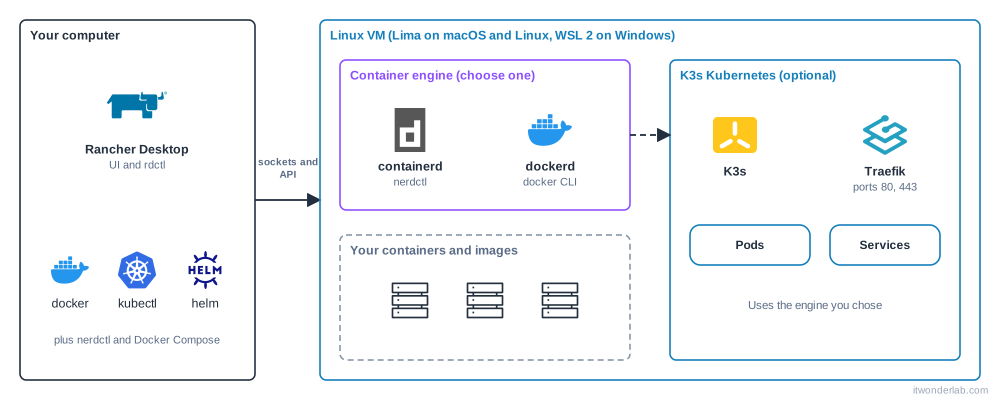
Containers need a Linux kernel, so on every platform Rancher Desktop runs a small Linux virtual machine: WSL 2 on Windows and Lima on macOS and Linux. The tools on your computer talk to the engine inside it.
Requirements #
| macOS | Windows | Linux | |
|---|---|---|---|
| Operating system | macOS 13 (Ventura) or newer | Windows 11 (Home included) or Windows Server 2025, with WSL installed | A distribution that supports .deb, .rpm or AppImage |
| CPU | Apple Silicon or Intel with VT-x | Virtualization enabled in the BIOS or UEFI | x86_64 with AMD-V or VT-x |
| Other | WSL installed | Read and write access to /dev/kvm |
|
| Recommended | 8 GB of RAM and 4 CPU cores | 8 GB of RAM and 4 CPU cores | 8 GB of RAM and 4 CPU cores |
Always check the official installation guide for the current requirements.
Install on macOS #
Download the .dmg from the GitHub releases (choose Apple Silicon or Intel), drag Rancher Desktop to the Applications folder and start it. You can also use Homebrew:
$ brew install --cask rancherInstall on Windows #
Download the .msi installer from the GitHub releases, run it and accept the license. Rancher Desktop uses WSL 2, so make sure it is installed first:
> wsl --installDuring the installation the Rancher Desktop Privileged Service asks for administrator permission: it is needed to expose applications on all network interfaces.
Install on Linux #
On Linux the virtual machine uses KVM, so first verify that you can access it, and add your user to the kvm group if you cannot:
$ [ -r /dev/kvm ] && [ -w /dev/kvm ] || echo 'insufficient privileges'
$ sudo usermod -a -G kvm "$USER"
Log out and in again after changing groups. Rancher Desktop stores credentials with pass, which needs a GPG key (see using PGP). To let your containers publish ports below 1024, such as 80 and 443, allow unprivileged ports:
$ sudo sysctl -w net.ipv4.ip_unprivileged_port_start=80Add the repository and install the package on Ubuntu and Debian:
$ curl -s https://download.opensuse.org/repositories/isv:/Rancher:/stable/deb/Release.key | gpg --dearmor | sudo dd status=none of=/usr/share/keyrings/isv-rancher-stable-archive-keyring.gpg
$ echo 'deb [signed-by=/usr/share/keyrings/isv-rancher-stable-archive-keyring.gpg] https://download.opensuse.org/repositories/isv:/Rancher:/stable/deb/ ./' | sudo dd status=none of=/etc/apt/sources.list.d/isv-rancher-stable.list
$ sudo apt update && sudo apt install rancher-desktop
On Fedora:
$ sudo dnf config-manager addrepo --from-repofile=https://download.opensuse.org/repositories/isv:/Rancher:/stable/fedora/isv:Rancher:stable.repo
$ sudo dnf install rancher-desktop
On openSUSE use zypper addrepo https://download.opensuse.org/repositories/isv:/Rancher:/stable/rpm/isv:Rancher:stable.repo and zypper install rancher-desktop. An AppImage is also available if you prefer not to add a repository.
First start: choose the engine and Kubernetes #
The first time you start Rancher Desktop it asks two questions:
- Container engine: dockerd (moby) gives you the
dockercommand and the same behavior as Docker Desktop. containerd gives you thenerdctlcommand. You can change it later, but images and containers are not shared between the two. The next tutorial explains how to choose. - Enable Kubernetes and the version of Kubernetes to run. Disable it if you only need containers: it saves memory and CPU.
Also review Preferences > Virtual Machine to give the VM the memory and CPUs it needs. The defaults are small for a development machine running a database and several services.
Wait until the status shows that the engine is running. The command line tools are linked into your path, so open a new terminal.
Verify the installation #
$ docker version
$ docker run --rm hello-world
$ docker context ls
With the dockerd engine, docker context ls shows a rancher-desktop context pointing at the socket of the VM, selected as the current one. With containerd use nerdctl instead:
$ nerdctl version
$ nerdctl run --rm hello-world
If you enabled Kubernetes, check the cluster:
$ kubectl config get-contexts
$ kubectl get nodes
NAME                   STATUS   ROLES                  AGE   VERSION
lima-rancher-desktop   Ready    control-plane,master   2m    v1.x.x+k3s1
Run a container and see it in the UI #
$ docker run -d --name web -p 8080:80 nginx:1.27
$ curl -I http://localhost:8080
Open the Rancher Desktop window: the Containers tab lists web, and recent versions let you open a shell, inspect it and see live stats from there. Remove it with docker rm -f web.
Uninstall #
Quit the application and remove the package (sudo apt remove rancher-desktop, drag the app to the trash on macOS, or use Apps and features on Windows). In the application, Troubleshooting > Factory Reset deletes the VM with all its images and containers.
Next steps #
- Choose between the two engines: containerd vs dockerd.
- Learn the everyday Docker CLI commands.
- Use the cluster: Kubernetes in Rancher Desktop.
Related tutorials
 Containers and Orchestration
Rancher Desktop
Rancher Desktop is a free open source app with a container engine (containerd or dockerd) and a local K3s Kubernetes cluster for Linux, macOS and Windows.
- Docker & Rancher Desktop Tutorials
Install Traefik with Docker: Reverse Proxy with Automatic Routing
Run Traefik v3 with Docker Compose, route several containers by hostname with labels, add the dashboard, middlewares and automatic Let's Encrypt certificates.
- Kubernetes Tutorials
Create a Local Kubernetes Cluster with kind: Multi-Node, Ingress and Local Images
Install kind, create a multi-node Kubernetes cluster in Docker with port mappings, deploy an app, load local images without a registry and delete the cluster.