In this Terraform and Ansible demo for AWS you can find all the code needed to create a VPC (Virtual Private Cloud) in AWS (Amazon Web Services) with an EC2 (Elastic Compute) instance connected to MariaDB database running in RDS (Relational Database Services) using a single Terraform 0.12 plan and installing and configuring an Ubuntu server with Nginx, PHP, and Let’s Encrypt to run WordPress with Ansible.
This VPC can be used to install a simple web application like WordPress using Ansible, which will be shown in another post.
The demo follows some IT Wonder Lab best practices using only1 resources included in the AWS free tier plan.
A real infrastructure should make use of some resources that are not included in the AWS free tier plan like NAT instances and IPSec VPNs. It should also have different VPCs or at least subnets for each environment, reuse Terraform modules, and store the tfstate in a shared location (AWS S3), ...
AWS with Terraform: The Essential Guide: Sections
Our new tutorial series delves into cloud infrastructure deployment using Terraform or OpenTofu on AWS. In this series, the fundamentals are shown, guiding you through minimizing resource usage and simplifying the deployment complexities associated with cloud infrastructure. This tutorial series is a work in progress and will have these sections:
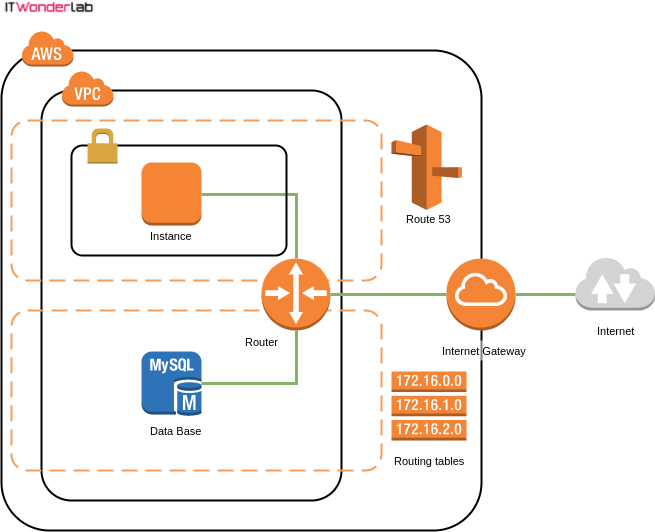
The diagram shows the main elements that will be created by Terraform:

The following asciicast shows how Terraform creates all the resources in AWS. Applying the whole plan takes around 10 minutes * (AWS RDS MariaDb creation takes more than 7 minutes).
Click on the play button to see the execution of the Terraform plan.
* The asciicast has been edited to show everything in 2 minutes.
A workstation running an operating system compatible with the required software. We will use Ubuntu for the demo.
chmod 764 whatismyip.sh
Terraform configuration files are used to describe infrastructure and to set variables, most of the examples are found on the Internet using a single file or at most a few files to configure all the infrastructure.
Best Practice: Terraform File Naming and Layout
In this example to create an AWS VPC with an EC2 Instance and a MariaDB RDS Data Base you will find a Terraform layout that follows our best practice recommendation for defining multiple environments on the same VPC using Terraform modules
The example has the following files:
| Name | Description |
|---|---|
| modules | Data source to get the ID of the latest AMI for selected OS |
| aws_ds_aws_ami.tf | Defines the file and patterns that should not be pushed to the git repository |
| aws_ec2_pro_wp.tf | Word Press Server, associated security groups, DNS registration |
| aws_ec2_pro_wp_vars.tf | Word Press Server variables |
| aws_internet_gateway.tf | Internet Gateway |
| aws_internet_gateway_vars.tf | Internet Gateway variables |
| aws_rds_pro_mariadb_01.tf | RDS MariaDB and associated security groups |
| aws_rds_pro_mariadb_01_vars.tf | RDS MariaDB variables |
| aws_rds_sn_pro.tf | RDS subnets |
| aws_rds_sn_pro_vars.tf | RDS subnets variables |
| aws_route53.tf | Route 53 (DNS) |
| aws_route53_vars.tf | Route 53 (DNS) variables |
| aws_sec_group_ec2_default.tf | Default security group to assign to all EC2 instances |
| aws_sec_group_ec2_default_vars.tf | Default EC2 security group variables |
| aws_sec_group_rds_mariadb_default.tf | Default security group to assign to all RDS MariaDB instances |
| aws_sec_group_rds_mariadb_default_vars.tf | Default RDS security group variables |
| aws_vpc_routing.tf | Routing tables for subnets |
| aws_vpc_routing_vars.tf | Routing tables for subnets variables |
| aws_vpc_subnets.tf | VPC subnets |
| aws_vpc_subnets_vars.tf | VPC subnets variables |
| aws_vpc.tf | VPC |
| aws_vpc_vars.tf | VPC variables |
| external_whatismyip.tf | Obtains current Public Internet IP for usage in firewall rules |
| provider_aws.tf | Defines AWS provider |
| provider_aws_vars.tf | Defines AWS provider variables |
| terraform.tf | Defines terraform |
| terraform.tfvars | Values for all the variables in the demo |
| terraform_vars.tf | Defines terraform variables |
| whatismyip.sh | Script to obtain current Public Internet IP |
| .gitignore | Defines the file and patterns that should not be pushed to git repository |
| .terraform | Working directory created by Terraform |
Terraform needs to have the Account ID and the credentials for the AWS account that will be used to interact with AWS API.
AWS credentials will be stored outside Terraform in ~/.aws/credentials, using the Shared Credentials file option for Terraform.
Best Practice: Terraform and AWS credentials: Terraform AWS provider has other options for credential configuration, but this one is an IT Wonder Lab best practice as it stores the credentials outside the Terraform configuration, therefore reducing the risk of credential leaking and it also allows each user that checkouts the code to run the Terraform plans with its own credentials.
Create or open the credentials file and add the following content:
[ditwl_infradmin]
aws_access_key_id=A1B2C3D4E5F6G7H8I9J0
aws_secret_access_key=QwertYuiopASDFGHJKL123456789sadfghjkvcbn
The profile name is surrounded by square brackets [ditwl_infradmin] and will be the name used in the Terraform configuration to identify the credentials to use.
aws_access_key_id and aws_secret_access_key are the ones obtained when creating the AWS IAM User for Demos.
You will also need to set other configurations related to AWS credentials in the file terraform.tfvars located in the root directory of the checked example:
#------------------------
# PROVIDERS
#------------------------

# DEFAULT AWS
provider_default_aws_profile = "ditwl_infradmin"
provider_default_aws_region = "us-east-1"
provider_default_aws_account_id = ["134567891011"]
provider_default_aws_shared_credentials_file = "~/.aws/credentials"
provider_default_aws_key_file = "~/keys/ditwl_kp_infradmin.pem"
The values from terraform.tfvars are used in provider_aws.tf to configure the AWS Provider.
Setting the allowed_account_ids prevents Terraform from applying changes to a different AWS account.
Best Practice: Redundancy in Configuration Files: IT Wonder Lab's best practice is to specify the provider_default_aws_account_id in the terraform.tfvars and use it to fill the allowed_account_ids in the AWS provider.
The aws_access_key_id of an IAM user is used for AWS to identify the Account ID that the user belongs to, and all operations are applied to that Account, so there is technically no need to specify the Account ID again.
This is an intended redundancy, as many others that you will find in IT Wonder Lab, it is a double check on the account to prevent catastrophic errors.
provider "aws" {
  shared_credentials_file = pathexpand(var.provider_default_aws_shared_credentials_file)
  profile                 = var.provider_default_aws_profile
  region                  = var.provider_default_aws_region
  allowed_account_ids     = var.provider_default_aws_account_id
  version                 = "~> 2.0"
}AWS creates a default VPC for each AWS Region when an account is created.
Deleting the default VPC is irreversible and you will need to contact AWS or recreate the account if you want to have a default VPC again.
Terraform provides a data source that lets you "adopt" the default VPC but that will not be used.
Best Practice: Terraform managed AWS VPC: An IT Wonder Lab best practice is to delete the default VPC and recreate everything using Terraform.
If you are going to be responsible for the Cloud Infrastructure, better know everything about it.
You have to be in control of every piece of the infrastructure (like the chosen IP Range) and I like to be aware of all the details
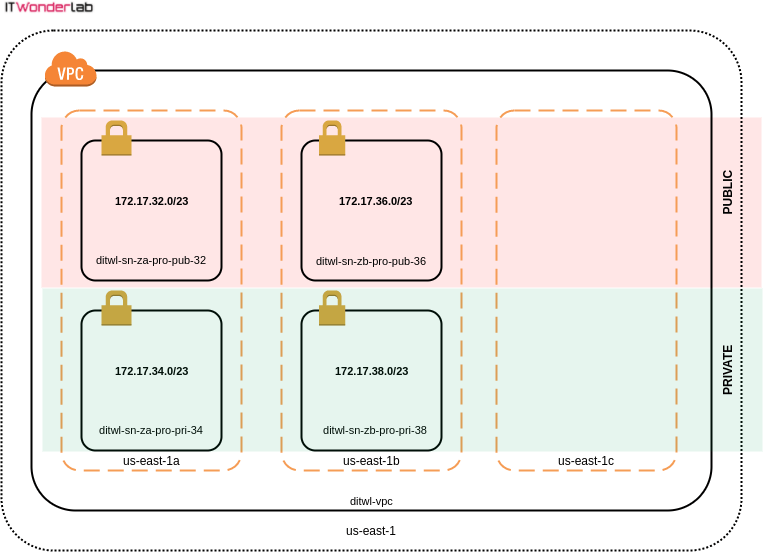
The VPC will be created using the 172.17.32.0/19 private IPv4 address range (8192 IPs) divided into many smaller subnets of 512 hosts (subnet mask/23). See ipv4 Subnet Calculator.
terraform.tfvars
#------------------------
# VPC
#------------------------

aws_vpc_tag_name = "ditwl-vpc"
aws_vpc_block = "172.17.32.0/19" #172.17.32.1 - 172.16.67.254
For the demo, we will only provision 4 subnets.
Best Practice: Multiple AWS Availability Zones: An IT Wonder Lab's best practice is to distribute sub-nets in more than one Availability Zone and have private and public zones.

Instance placement has to take into account that data transfer between different Availability Zones has a cost, therefore achieving high availability by distributing infrastructure between Availability Zones has an impact on the total budget.
| CIDR | Host Address Range | Terraform name & Description |
|---|---|---|
| 172.17.32.0/23 | 172.17.32.1 - 172.17.33.254 | aws_sn_za_pro_pub_32 Zone: A Env: PRO Type: PUBLIC Code: 32 |
| 172.17.34.0/23 | 172.17.34.1 - 172.17.35.254 | aws_sn_za_pro_pri_34 Zone: A Env: PRO Type: PRIVATE Code: 34 |
| 172.17.36.0/23 | 172.17.36.1 - 172.17.37.254 | aws_sn_zb_pro_pub_36 Zone: B Env: PRO Type: PUBLIC Code: 36 |
| 172.17.38.0/23 | 172.17.38.1 - 172.17.39.254 | aws_sn_zb_pro_pri_38 Zone: B Env: PRO Type: PRIVATE Code: 38 |
| 172.17.40.0/23 | 172.17.40.1 - 172.17.41.254 | aws_sn_z?_pr?_p??_40 |
| 172.17.42.0/23 | 172.17.42.1 - 172.17.43.254 | aws_sn_z?_pr?_p??_42 |
| 172.17.44.0/23 | 172.17.44.1 - 172.17.45.254 | aws_sn_z?_pr?_p??_44 |
| 172.17.46.0/23 | 172.17.46.1 - 172.17.47.254 | aws_sn_z?_pr?_p??_46 |
| 172.17.48.0/23 | 172.17.48.1 - 172.17.49.254 | aws_sn_z?_pr?_p??_48 |
| 172.17.50.0/23 | 172.17.50.1 - 172.17.51.254 | aws_sn_z?_pr?_p??_50 |
| 172.17.52.0/23 | 172.17.52.1 - 172.17.53.254 | aws_sn_z?_pr?_p??_52 |
| 172.17.54.0/23 | 172.17.54.1 - 172.17.55.254 | aws_sn_z?_pr?_p??_54 |
| 172.17.56.0/23 | 172.17.56.1 - 172.17.57.254 | aws_sn_z?_pr?_p??_56 |
| 172.17.58.0/23 | 172.17.58.1 - 172.17.59.254 | aws_sn_z?_pr?_p??_58 |
| 172.17.60.0/23 | 172.17.60.1 - 172.17.61.254 | aws_sn_z?_pr?_p??_60 |
| 172.17.62.0/23 | 172.17.62.1 - 172.17.63.254 | aws_sn_z?_pr?_p??_62 |
terraform.tfvars
#------------------------
# SUBNETS
#------------------------

  #------------------------
  # For EC2 instances
  #------------------------

    #Zone: A, Env: PRO, Type: PUBLIC, Code: 32
    aws_sn_za_pro_pub_32={
      cidr   ="172.17.32.0/23" #172.17.32.1 - 172.17.33.254
      name   ="ditwl-sn-za-pro-pub-32"
      az     ="us-east-1a"
      public = "true"
    }

    #Zone: A, Env: PRO, Type: PRIVATE, Code: 34
    aws_sn_za_pro_pri_34={
      cidr   = "172.17.34.0/23" #172.17.34.1 - 172.17.35.254
      name   = "ditwl-sn-za-pro-pri-34"
      az     = "us-east-1a"
      public = "false"
    }

    #Zone: B, Env: PRO, Type: PUBLIC, Code: 36
    aws_sn_zb_pro_pub_36={
      cidr   = "172.17.36.0/23" #172.17.36.1 - 172.17.37.254
      name   = "ditwl-sn-zb-pro-pub-36"
      az     = "us-east-1b"
      public = "false"
    }

    #Zone: B, Env: PRO, Type: PRIVATE, Code: 38
    aws_sn_zb_pro_pri_38={
      cidr   = "172.17.38.0/23" #172.17.38.1 - 172.17.39.254
      name   = "ditwl-sn-zb-pro-pri-38"
      az     = "us-east-1b"
      public = "false"
}Run the Terraform plan command often as it is the best way to check that everything is correct. Some errors are difficult to identify, our recommendation is to make changes to the Terraform configuration in small doses and test the plan.
The following asciicast shows the elements that Terraform will create in AWS.
Click on the play button to see the execution of the Terraform plan.

IT Wonder Lab tutorials are based on the diverse experience of Javier Ruiz, who founded and bootstrapped a SaaS company in the energy sector. His company, later acquired by a NASDAQ traded company, managed over €2 billion per year of electricity for prominent energy producers across Europe and America. Javier has over 25 years of experience in building and managing IT companies, developing cloud infrastructure, leading cross-functional teams, and transitioning his own company from on-premises, consulting, and custom software development to a successful SaaS model that scaled globally.
Hey,
thanks for the tutorials.
what's the reason for the "za" in the naming?
aws_sn_za_pro_pub_32 = { …}
Thanks Martin
ZA corresponds to Availability Zone A in the AWS region.