# Terraform Cloud Agents in a Kubernetes Cluster
> How Terraform Cloud agents (HCP Terraform agents) run Terraform on private infrastructure, deployed in a Kubernetes cluster with Terraform itself.
- Source: https://www.itwonderlab.com/terraform-agents-kubernetes/
- Published: 2023-06-19
- Updated: 2026-10-05
- Author: Javier Ruiz Jiménez (https://www.javierruizjimenez.com/)
- Site: IT Wonder Lab (https://www.itwonderlab.com/)
---
> [!NOTE]
> Terraform Cloud is now named **HCP Terraform**, and the agents are called HCP Terraform agents. This tutorial was written in August 2020: the plans, the screenshots and the product limits (the Business tier, the agent features) have changed since then, so check the current [HCP Terraform documentation](https://developer.hashicorp.com/terraform/cloud-docs/agents). The same idea applies to other platforms with self-hosted runners.
## What are the Terraform Cloud Agents?
Terraform allows companies to provision and manage cloud infrastructure using best practices by defining the infrastructure as code.
**Terraform Cloud Agents are small binaries that can be installed in private clouds or on-premises that execute Terraform runs (plan, apply, and destroy) on behalf of the Terraform Cloud.**
Terraform Cloud is a SaaS application to provision and manage infrastructure using Terraform through a [SOC 2 Type I Compliant](https://www.hashicorp.com/blog/hashicorp-achieves-soc-2-type-i-compliance/?utm_source=itwonderlab) and enterprise-ready solution for teams and companies.
HCP Terraform (formerly Terraform Cloud) manages the Terraform state file and pulls changes in infrastructure from VCS providers like GitHub to trigger modifications on infrastructure.
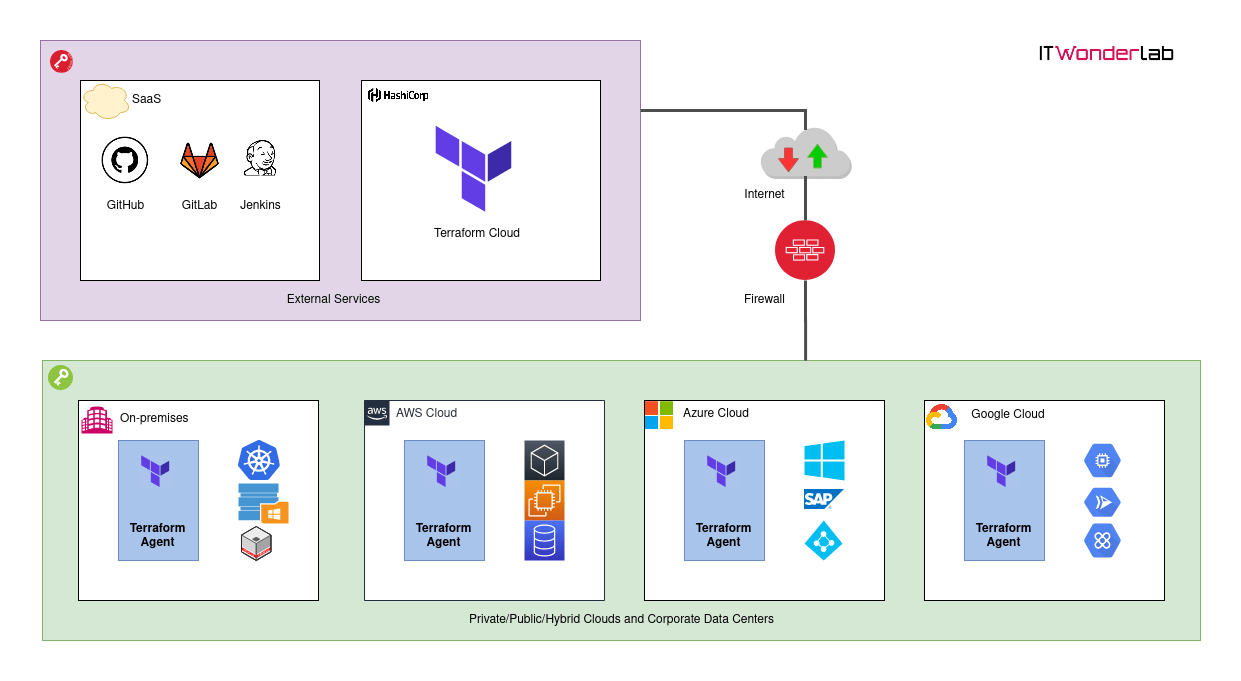
When this was written, companies that wanted to use Terraform Cloud needed to publish their infrastructure on the Internet, as each Terraform run (plan, apply, destroy) was executed in HashiCorp servers in the public Cloud or had to install an on-premises edition named Terraform Enterprise.
Terraform Cloud Agents were announced by [HashiCorp on August 12 2020 for its new Terraform Cloud Business Tier](https://www.hashicorp.com/blog/announcing-hashicorp-terraform-cloud-business/?utm_source=itwonderlab) along with other enterprise functionality in the security and auditing space.
### Why a Company needs a Terraform Agent?
**With Terraform Cloud Agents, a company can manage its private infrastructure as code and benefit from all the functionality of Terraform in a SaaS scenario.**
Agents are small binaries (or a convenient docker image or a Kubernetes POD) that run inside a company data center (on-premises infrastructure or in public or private cloud or both leveraging hybrid cloud).
Terraform Cloud Business edition can:
- Manage on-premises infrastructure with Terraform.
- Manage private virtual clouds in public clouds like AWS, Azure, or Google.
- Keep all private infrastructure isolated from the Internet.
- Follow a strict configuration management process.
- Enforce better practices.
Terraform Cloud Agents are responsible for contacting the Terraform Cloud server to get instructions and execute the Terraform runs. The company only needs to allow outbound traffic to Terraform Cloud servers and can keep inbound traffic limited or denied.
## Managing Internal Infrastructure with Terraform Cloud and its Agents
In this tutorial, we will be using Terraform Cloud Business Edition to manage all the Terraform Infrastructure as code and an agent installed inside a private Kubernetes cluster to execute the plans.
The Kubernetes cluster only has outbound access to the Internet. The agent installed in the cluster will contact Terraform Cloud to get instructions.
Although Terraform is traditionally used to deploy infrastructure and applications are handled with Ansible, the usage of Kubernetes and containers has made it possible to use Terraform to deploy all the infrastructure needed by an Application and the application itself.
### Deployment process using Terraform Cloud and its Agents
In our demo, the Color App will be deployed inside our internal Kubernetes Cluster. The Color App created by IT Wonder Lab to test Istio Patterns is a small go web page that changes its background color based on cookies or the value of environment variables.
Updates:
- 18 August 2020: Move PEM Certificates to Terraform Cloud Variables
This tutorial deploys Terraform Agent(s) in Kubernetes using a Terraform plan (of course!). There were no official instructions in the Terraform documentation for Kubernetes and IT Wonder Lab has not done extensive testing.
Prerequisites:
- A [Terraform Cloud Business account](https://www.hashicorp.com/products/terraform/pricing/?utm_source=itwonderlab).
- A working Kubernetes Cluster. We will be using the one created in [Kubernetes Cluster using Vagrant and Ansible (in 3 minutes)](https://www.itwonderlab.com/ansible-kubernetes-vagrant-tutorial/).
### Terraform Cloud Agent Life Cycle
Our Terraform Cloud Agent will have a life cycle triggered by changes in the infrastructure code of our demo App.
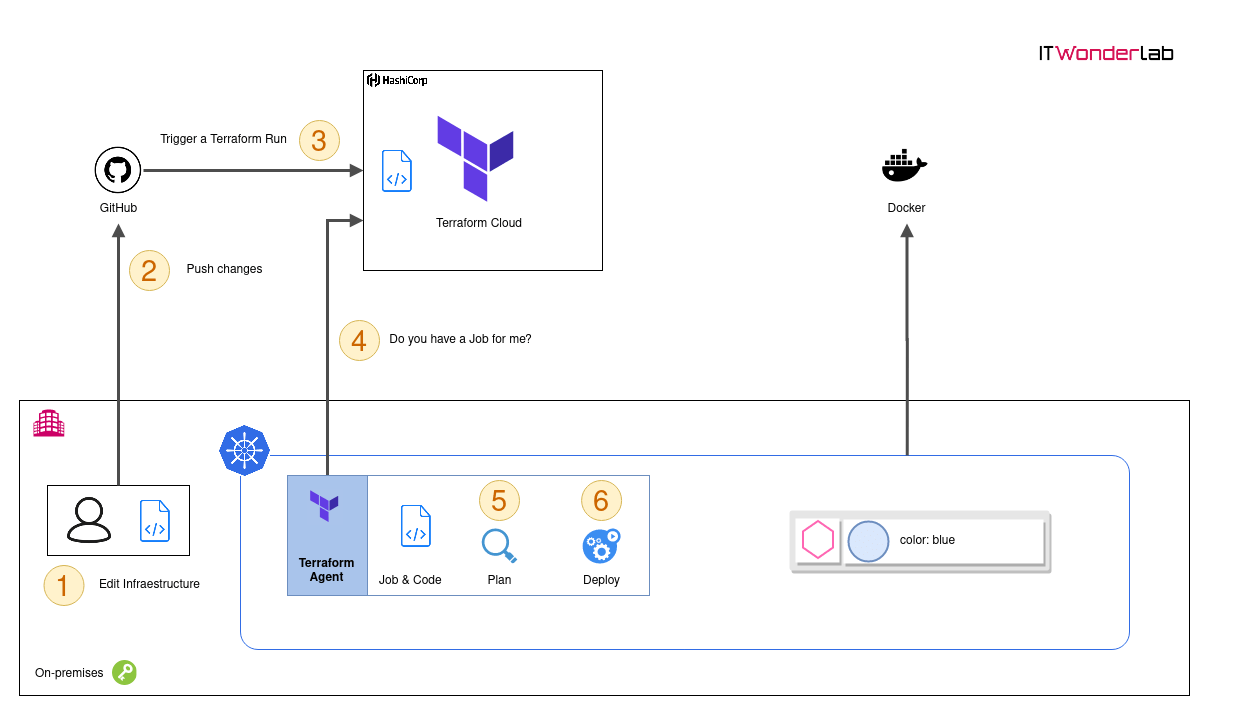
1. A user edits a Terraform plan
2. The changes in the plan are committed to GitHub
3. A hook is executed by GitHub informing Terraform Cloud of the change in code, Terraform Cloud downloads the changes in code and schedules a Terraform run.
4. The Terraform Agent that runs inside the on-premises Kubernetes cluster is continuously asking Terraform Cloud if it has a job for it, now it does because GitHub triggered a Terraform run in a Terraform Cloud workspace. The Terraform Agent pulls the job and the source code
5. The Terraform Agent downloads the needed Terraform binary and the needed providers, in this example our Terraform uses the Kubernetes provider to execute the Terraform plan. It sends the result to Terraform Cloud and if accepted, Terraform Cloud tells the agent to apply the change.
6. The Terraform Agent applies the change. In our Terraform code, we are creating a deployment of the Color App that is stored as a Docker image in a Docker Registry and a Service Port to access the published Application. The results of the execution are sent to Terraform Cloud.
### Create a Token for the Terraform Cloud Agent
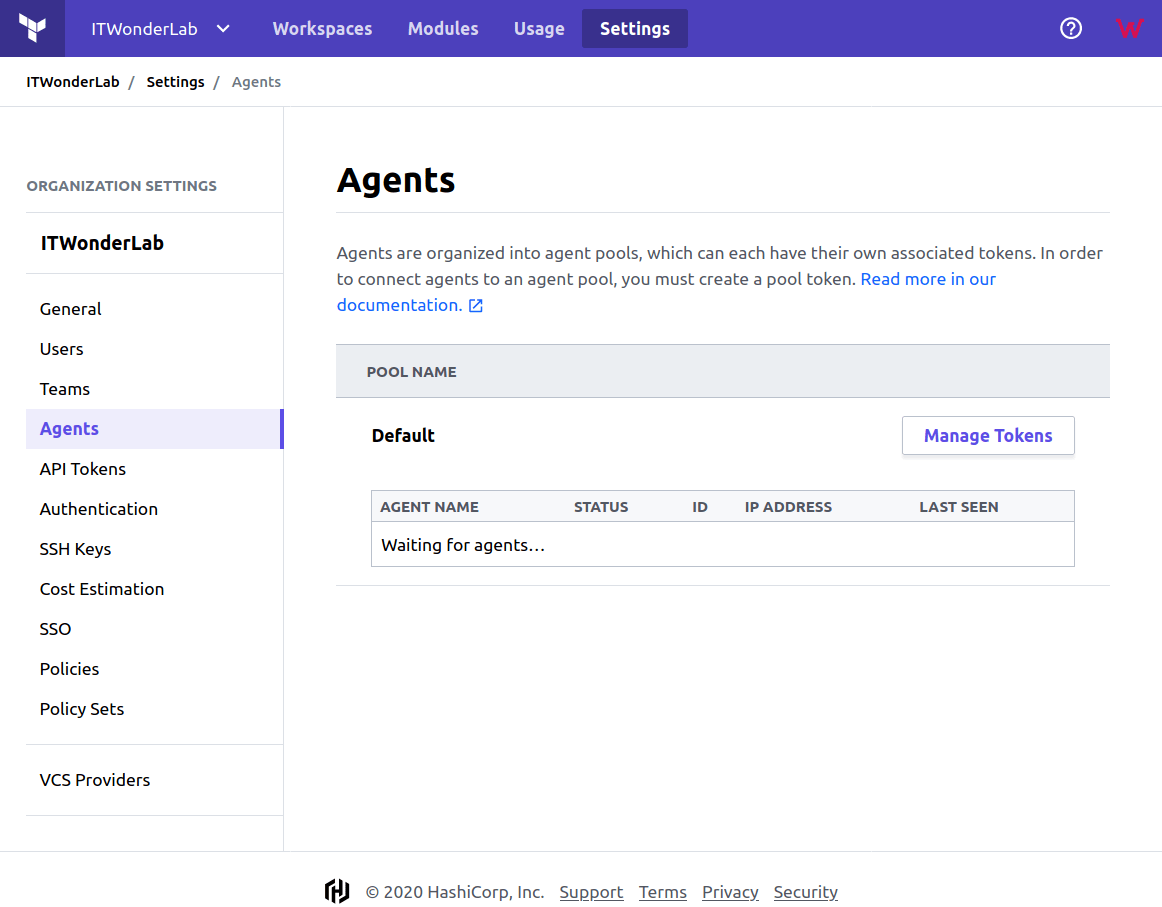
Open [https://app.terraform.io/](https://app.terraform.io/?utm_source=itwonderlab) and go to Settings -> Agent page to register a new Agent Token.
**Click on Manage tokens**
---
**Click on the new token**
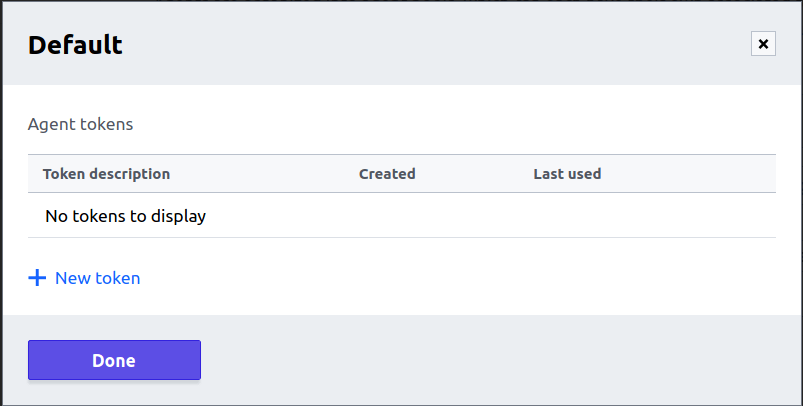
---
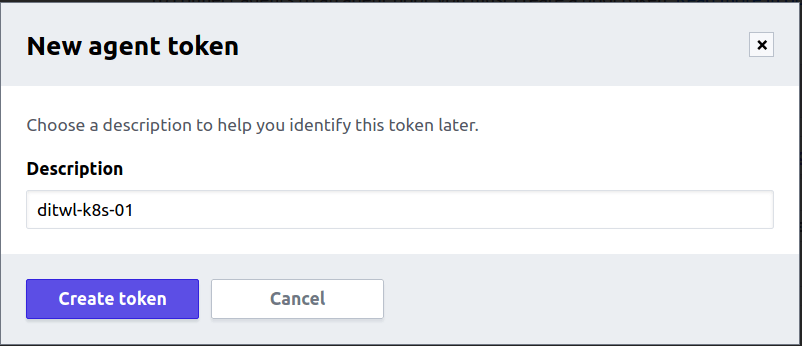
**Set a name**
We will use ditwl-agent-k8s-01 and click Create token:
---
**The new agent token is shown**
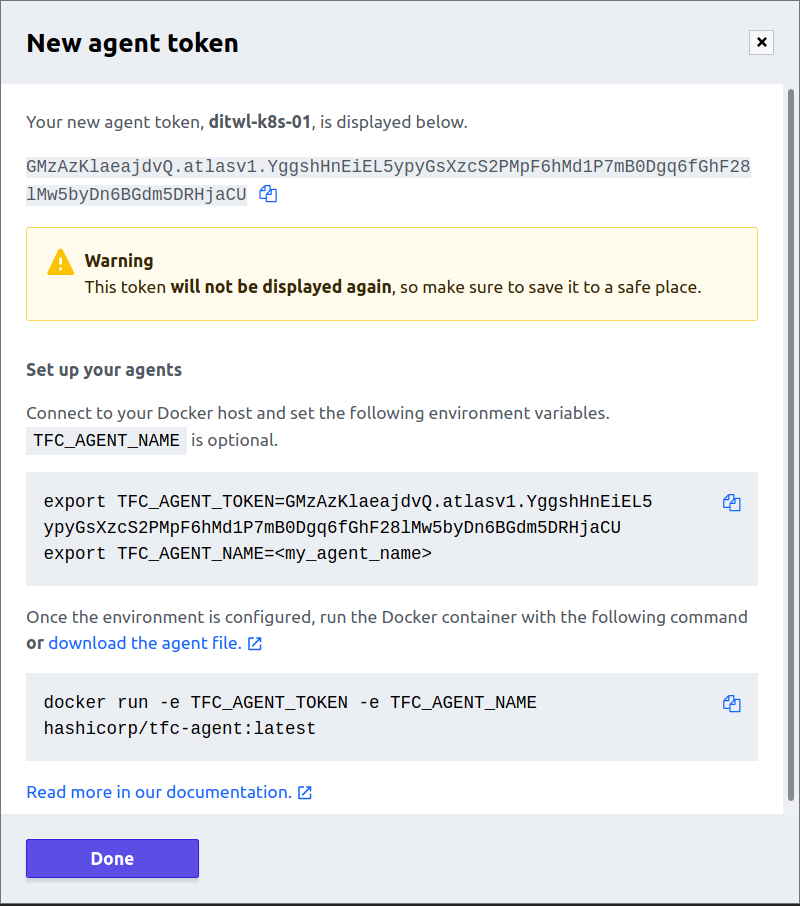
**Keep the Token Safe**: Don’t publish or share the Token, it will be used by the Agent to securely register itself with your Terraform Cloud instance.
Store the value of the new agent token, we will use the token and the name as environment variables for our Kubernetes Terraform Cloud Agent deployment.
### Deploying the Terraform Cloud Agent in Kubernetes
We will use a local Terraform configuration to deploy the Terraform Cloud Agent in our Kubernetes Cluster.
### Create the Terraform Configuration file
Set the values of the Terraform Cloud Agent name and token as ENV variables in the Terraform configuration file:
- TFC\_AGENT\_NAME
- TFC\_AGENT\_TOKEN
**ditwl-agent-k8s.tf**
```json
terraform {
required_version = "~> 0.12"
}
#-----------------------------------------
# Default provider: Kubernetes
#-----------------------------------------
provider "kubernetes" {
#Context to choose from the config file.
config_context = "kubernetes-admin@ditwl-k8s-01"
version = "~> 1.12"
}
#-----------------------------------------
# KUBERNETES DEPLOYMENT COLOR APP
#-----------------------------------------
resource "kubernetes_deployment" "tfc-agent" {
metadata {
name = "tfc-agent"
labels = {
app = "tfc-agent"
} //labels
} //metadata
spec {
selector {
match_labels = {
app = "tfc-agent"
} //match_labels
} //selector
#Number of replicas
replicas = 1
#Template for the creation of the pod
template {
metadata {
labels = {
app = "tfc-agent"
} //labels
annotations = {
"sidecar.istio.io/inject" = "false"
}
} //metadata
spec {
container {
image = "hashicorp/tfc-agent:latest" #Docker image name
name = "tfc-agent" #Name of the container specified as a DNS_LABEL.
#Each container in a pod must have a unique name (DNS_LABEL).
#Block of string name and value pairs to set in the container's environment
env {
name = "TFC_AGENT_TOKEN"
value = "GMzAzKlaeajdvQ.atlasv1.YggshHnEiEL5ypyGsXzcS2PMpF6hMd1P7mB0Dgq6fGhF28lMw5byDn6BGdm5DRHjaCU"
} //env
env {
name = "TFC_AGENT_NAME"
value = "ditwl-agent-k8s-01"
} //env
resources {
limits {
cpu = "1"
memory = "512Mi"
} //limits
requests {
cpu = "250m"
memory = "50Mi"
} //requests
} //resources
} //container
} //spec
} //template
} //spec
} //resource
```
### Initialize, plan, and apply the Terraform Configuration
Run
```bash
$terraform init
$terraform plan
$terraform apply
```
See the execution of `terraform apply` in our Kubernetes cluster:
### Check the Deployment of the Terraform Cloud Agent in the Kubernetes Cluster
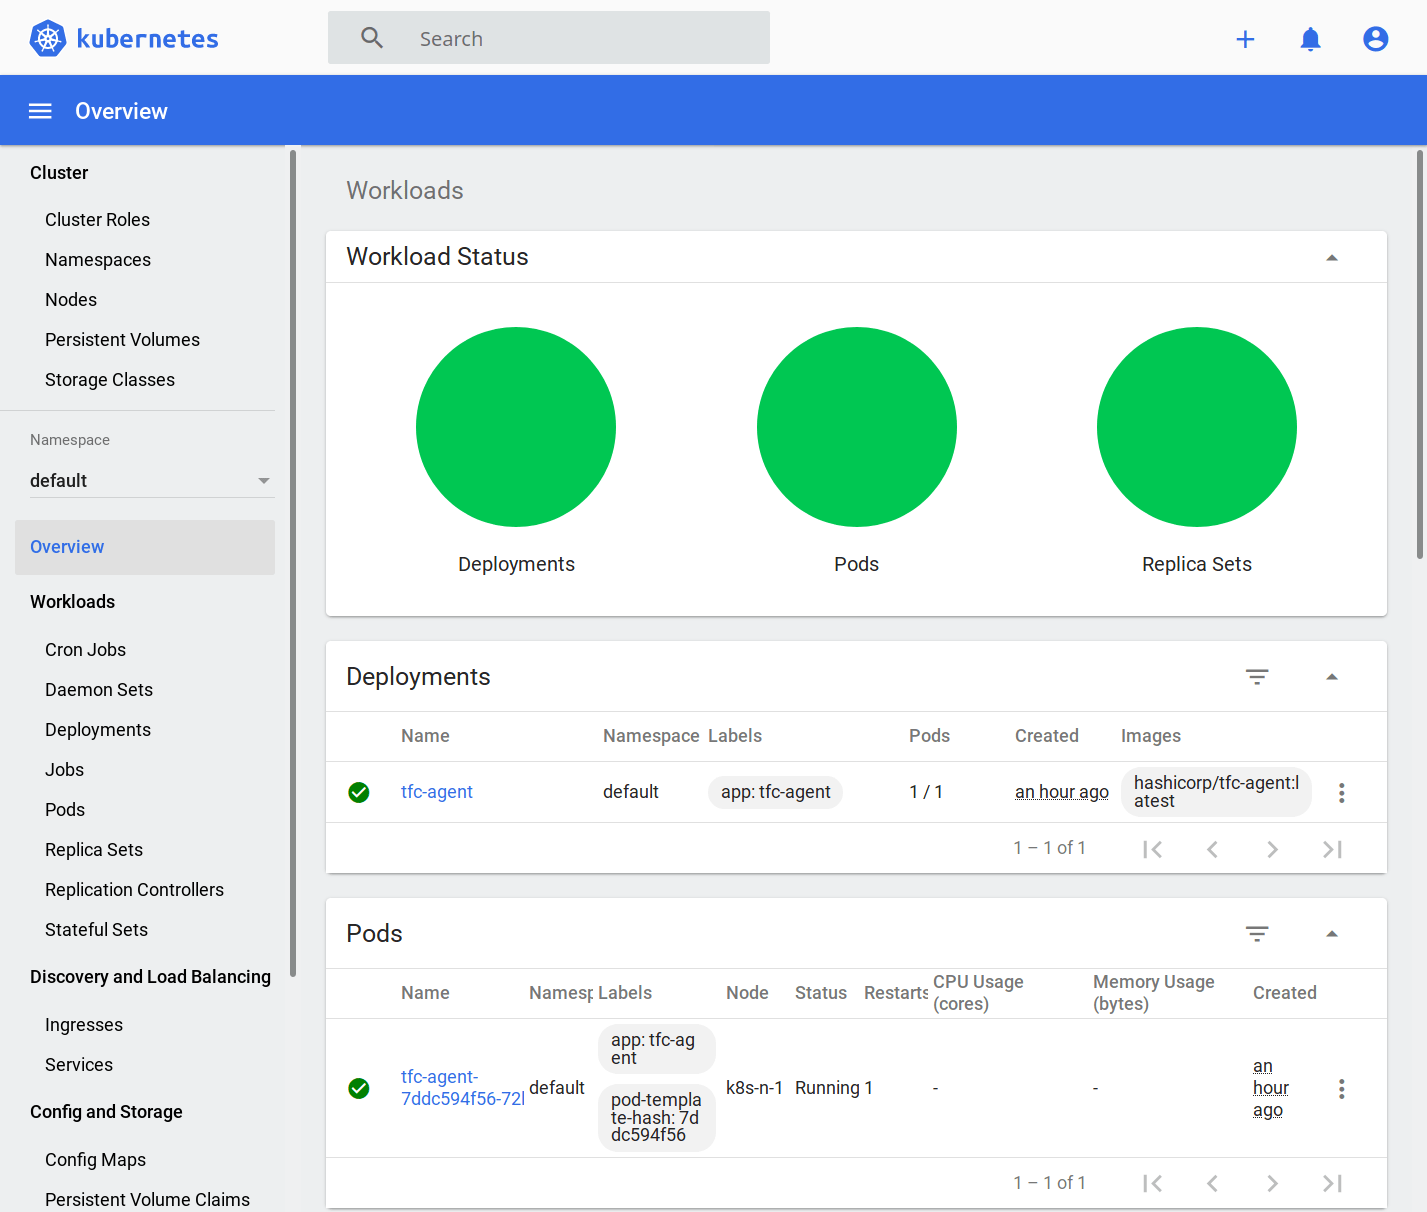
Access the Kubernetes Dashboard or use the `kubectl` command to check the status of the deployment.
**Kubernetes dashboard**
**Check using `kubectl`**
```shell
$ kubectl get all
NAME READY STATUS RESTARTS AGE
pod/tfc-agent-7ddc594f56-72ljm 1/1 Running 1 72m
NAME TYPE CLUSTER-IP EXTERNAL-IP PORT(S) AGE
service/kubernetes ClusterIP 10.96.0.1 443/TCP 11d
NAME READY UP-TO-DATE AVAILABLE AGE
deployment.apps/tfc-agent 1/1 1 1 72m
NAME DESIRED CURRENT READY AGE
replicaset.apps/tfc-agent-7ddc594f56 1 1 1 72m
```
## Check the Status of the Terraform Cloud Agent
Once deployed in Kubernetes, the Terraform Cloud Agent will contact Terraform Cloud and register to receive jobs.
**See the agent status**
Open [https://app.terraform.io/](https://app.terraform.io/?utm_source=itwonderlab) and go to Settings -> Agent page to see the status.
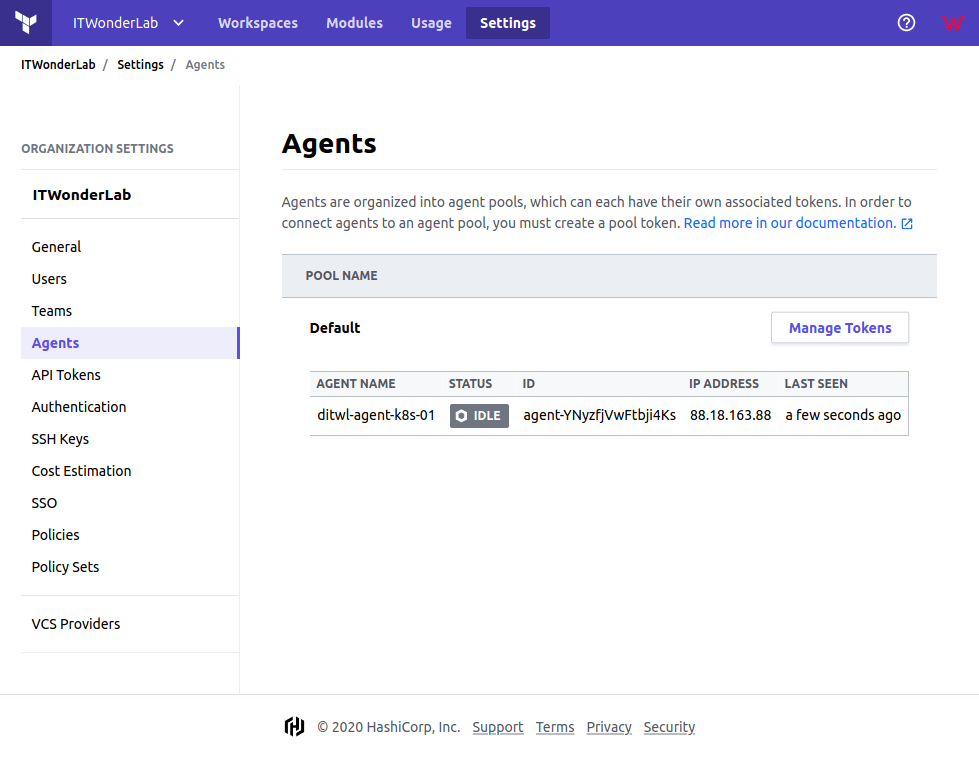
Our Kubernetes Terraform Cloud Agent has registered and is ready to receive jobs.
### Debugging the Terraform Cloud Agent
To debug issues with the Agent or with Terraform, increase the log level, and check agent logs using the Kubernetes Dashboard or the command line.
To increase the log level of the agent and Terraform set a new environment variable in the Terraform Kubernetes Deployment resource and apply the change to Kubernetes using `terraform apply`
- Name: TFC\_AGENT\_LOG\_LEVEL
- Allowed values: “trace”, “debug”, “info”, “warn”, and “error”.
**Edit ditwl-agent-k8s.tf adding the new TFC\_AGENT\_LOG\_LEVEL ENV variable and its value**
```json
env {
name = "TFC_AGENT_NAME"
value = "ditwl-agent-k8s-01"
} //env
env {
name = "TFC_AGENT_LOG_LEVEL"
value = "DEBUG"
} //env
```
**Do not set the environment variable TF\_LOG**
TF\_LOG is used to debug Terraform plans in a command-line execution of Terraform, but if set the agent fails as it is not prepared to deal with debug messages from the Terraform binary in this way. Use instead TFC\_AGENT\_LOG\_LEVEL which will instruct Terraform to output debug information as well.
**Apply the change to the Kubernetes cluster**
```bash
$terraform apply
kubernetes_deployment.tfc-agent: Refreshing state... [id=default/tfc-agent]
An execution plan has been generated and is shown below.
Resource actions are indicated with the following symbols:
~ update in-place
...
kubernetes_deployment.tfc-agent: Modifying... [id=default/tfc-agent]
kubernetes_deployment.tfc-agent: Modifications complete after 1s [id=default/tfc-agent]
Apply complete! Resources: 0 added, 1 changed, 0 destroyed.
```
**Using the command `kubectl` get the name of the POD running the Agent**
```shell
$ kubectl get pods
NAME READY STATUS RESTARTS AGE
color-blue-dep-bcb4d8b9c-5qlrw 1/1 Running 0 15m
color-blue-dep-bcb4d8b9c-j5gk4 1/1 Running 0 15m
color-blue-dep-bcb4d8b9c-k4p76 1/1 Running 0 15m
tfc-agent-7cd5545984-szfwx 1/1 Running 0 20m
```
**Stream the POD logs**
```bash
$kubectl logs -f tfc-agent-7cd5545984-szfwx
2020-08-15T12:57:36.442Z [INFO] agent: Starting: name=ditwl-agent-k8s-01 version=0.1.2
2020-08-15T12:57:36.442Z [DEBUG] plugin: starting plugin: path=/usr/bin/tfc-agent-core args=[/usr/bin/tfc-agent-core]
2020-08-15T12:57:36.442Z [DEBUG] plugin: plugin started: path=/usr/bin/tfc-agent-core pid=9
2020-08-15T12:57:36.442Z [DEBUG] plugin: waiting for RPC address: path=/usr/bin/tfc-agent-core
2020-08-15T12:57:36.501Z [DEBUG] plugin.tfc-agent-core: plugin address: network=unix address=/tmp/plugin751737478 timestamp=2020-08-15T12:57:36.501Z
2020-08-15T12:57:36.501Z [DEBUG] plugin: using plugin: version=1
2020-08-15T12:57:36.506Z [INFO] core: Starting: version=0.1.2
2020-08-15T12:57:36.506Z [DEBUG] core: Registering agent...
2020-08-15T12:57:37.053Z [INFO] core: Agent registered successfully with Terraform Cloud: id=agent-47ao7XsLiLF39btP pool-id=apool-HEdmePLwpjdMwyo7
2020-08-15T12:57:37.069Z [DEBUG] agent: Starting periodic core updates: interval=1h0m0s
2020-08-15T12:57:37.069Z [INFO] core: Waiting for next job
...
2020-08-15T13:01:42.174Z [DEBUG] terraform.cli: Plan: 2 to add, 0 to change, 0 to destroy.
2020-08-15T13:01:48.582Z [INFO] terraform: Generating and uploading provider schemas JSON
2020-08-15T13:01:48.582Z [DEBUG] terraform: Running command: cmd="/root/.tfc-agent/component/terraform/runs/run-kxyUydYxPCVA9sBe.plan/bin/terraform providers schema -json"
2020-08-15T13:01:49.371Z [DEBUG] core: Updating status: agent=busy job=running
2020-08-15T13:02:01.676Z [INFO] terraform: Persisting filesystem to remote storage
2020-08-15T13:02:03.372Z [DEBUG] terraform: Output stream has stopped
2020-08-15T13:02:03.435Z [INFO] terraform: Finished handling run
2020-08-15T13:02:03.436Z [DEBUG] core: Updating status: agent=idle job=finished
2020-08-15T13:02:03.978Z [INFO] core: Waiting for next job
2020-08-15T13:02:04.647Z [INFO] core: Job received: type=apply id=run-kxyUydYxPCVA9sBe
2020-08-15T13:02:04.647Z [INFO] terraform: Handling run: id=run-kxyUydYxPCVA9sBe type=apply org=ITWonderLab workspace=terraform-cloud-agent-k8s-deploy-app
```
### Color App Terraform Configuration
The following file defines the Terraform configuration that Terraform Cloud will download from the GitHub repository https://github.com/itwonderlab/terraform-cloud-agent-k8s-deploy-app.
**This is not a best practice**: IT Wonder Lab’s best practices for infrastructure include modularizing Terraform configuration. In this example, we define everything in a single file. See other tutorials for Terraform best practices for Kubernetes deployments.
**ditwl-k8s-color.tf**
```json
# Copyright (C) 2018 - 2020 IT Wonder Lab (https://www.itwonderlab.com)
#
# This software may be modified and distributed under the terms
# of the MIT license. See the LICENSE file for details.
# -------------------------------- WARNING --------------------------------
# IT Wonder Lab's best practices for infrastructure include modularizing
# Terraform configuration.
# In this example, we define everything in a single file.
# See other tutorials for Terraform best practices for Kubernetes deployments.
# -------------------------------- WARNING --------------------------------
terraform {
required_version = "~> 0.12"
}
variable "cluster_ca_certificate" {
description = "CA Certificate PEM Encoded"
}
variable "client_certificate" {
description = "Client Certificate PEM Encoded"
}
variable "client_key" {
description = "Client Key PEM Encoded"
}
#-----------------------------------------
# Default provider: Kubernetes
#-----------------------------------------
provider "kubernetes" {
version = "~> 1.12"
load_config_file = "false"
host = "kubernetes.default.svc" #host = "https://192.168.50.11:6443"
cluster_ca_certificate = var.cluster_ca_certificate
client_certificate = var.client_certificate
client_key = var.client_key
}
#-----------------------------------------
# KUBERNETES DEPLOYMENT COLOR APP
#-----------------------------------------
resource "kubernetes_deployment" "color" {
metadata {
name = "color-blue-dep"
labels = {
app = "color"
color = "blue"
} //labels
} //metadata
spec {
selector {
match_labels = {
app = "color"
color = "blue"
} //match_labels
} //selector
#Number of replicas
replicas = 1
#Template for the creation of the pod
template {
metadata {
labels = {
app = "color"
color = "blue"
} //labels
annotations = {
"sidecar.istio.io/inject" = "false"
}
} //metadata
spec {
container {
image = "itwonderlab/color:latest" #Docker image name
name = "color-blue" #Name of the container specified as a DNS_LABEL. Each container in a pod must have a unique name (DNS_LABEL).
#Block of string name and value pairs to set in the container's environment
env {
name = "COLOR"
value = "blue"
} //env
#List of ports to expose from the container.
port {
container_port = 8080
} //port
resources {
limits {
cpu = "0.5"
memory = "512Mi"
} //limits
requests {
cpu = "250m"
memory = "50Mi"
} //requests
} //resources
} //container
} //spec
} //template
} //spec
} //resource
#-------------------------------------------------
# KUBERNETES DEPLOYMENT COLOR SERVICE NODE PORT
#-------------------------------------------------
resource "kubernetes_service" "color-service-np" {
metadata {
name = "color-service-np"
} //metadata
spec {
selector = {
app = "color"
} //selector
session_affinity = "ClientIP"
port {
port = 8080
node_port = 30085
} //port
type = "NodePort"
} //spec
} //resource
```
## Deploying the Color App in the Internal Kubernetes Cluster using Terraform Cloud
We can now create a Workspace in Terraform Cloud Business.
**Configure the workspace**
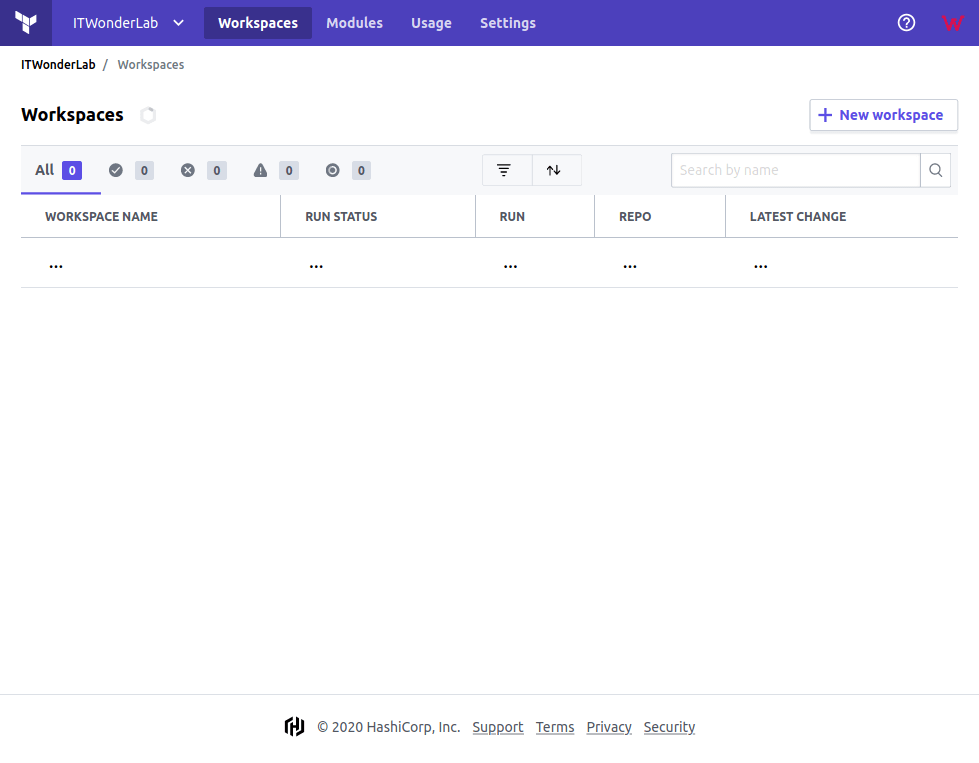
Open [https://app.terraform.io/](https://app.terraform.io/?utm_source=itwonderlab) and go to Workspaces.
---
**Click new workspace**
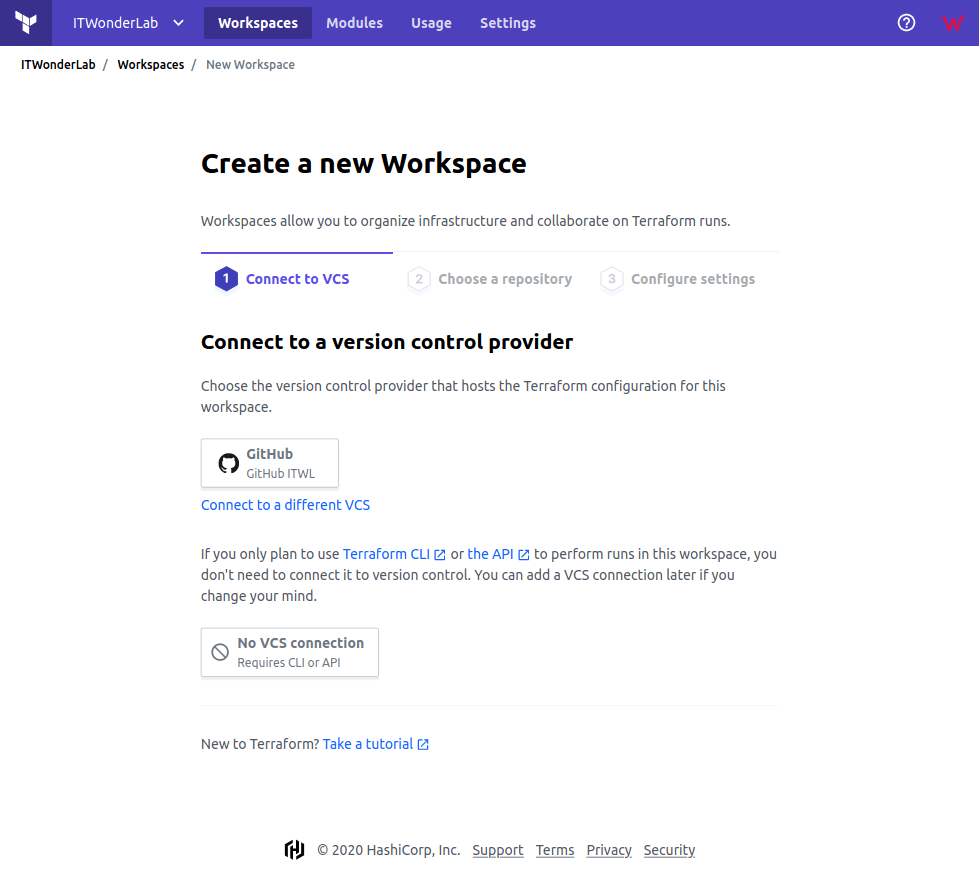
Under Connect to a version control provider click GitHub.
---
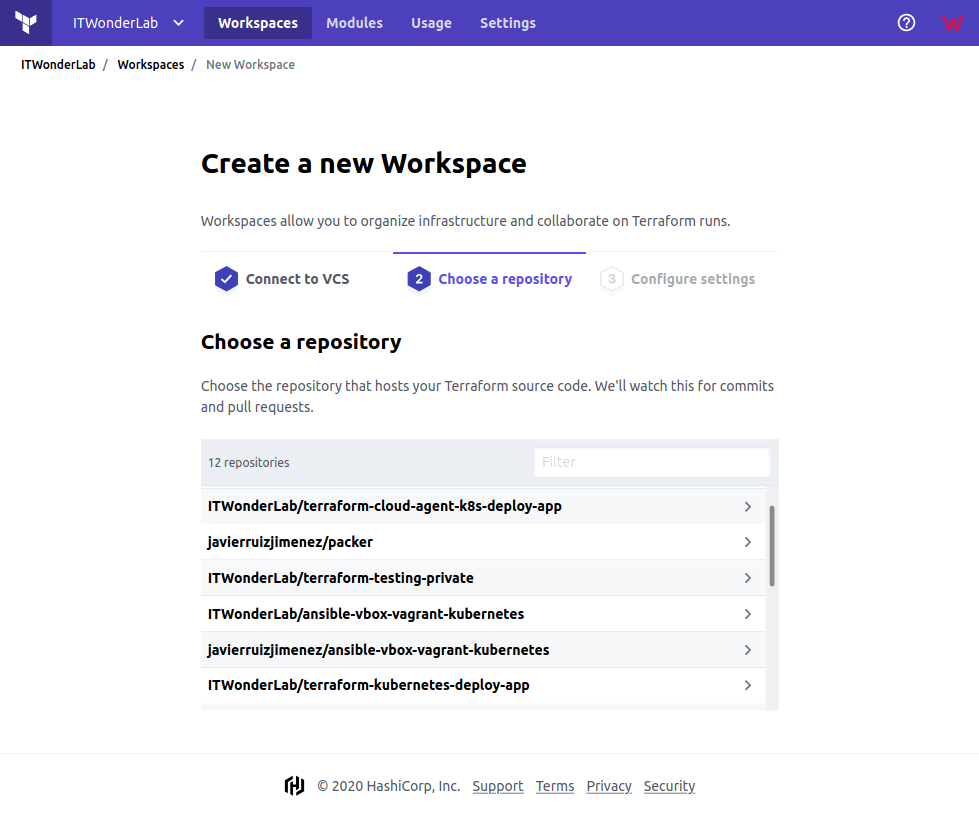
**Select the GitHub repository**
The repository has the Terraform configuration that we want to manage with Terraform Cloud, in our example it is [github.com/itwonderlab/terraform-cloud-agent-k8s-deploy-app](https://github.com/itwonderlab/terraform-cloud-agent-k8s-deploy-app).
---
**Finish the workspace creation**
Click on Create workspace
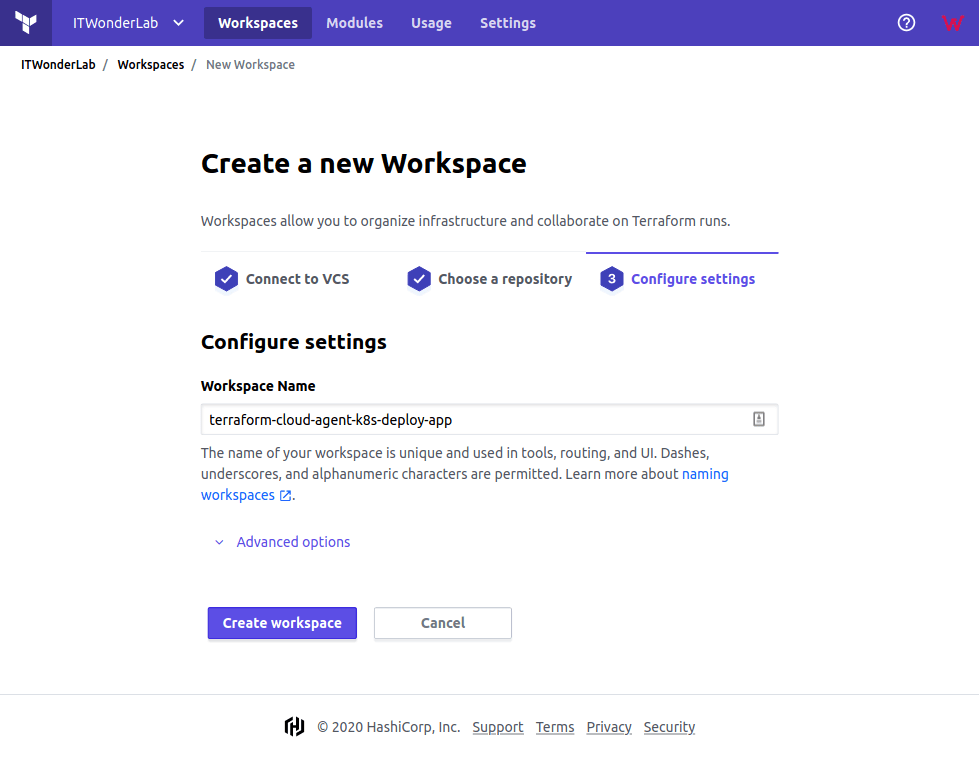
Wait a few seconds until Terraform Cloud downloads the repository and configures the Workspace.
---
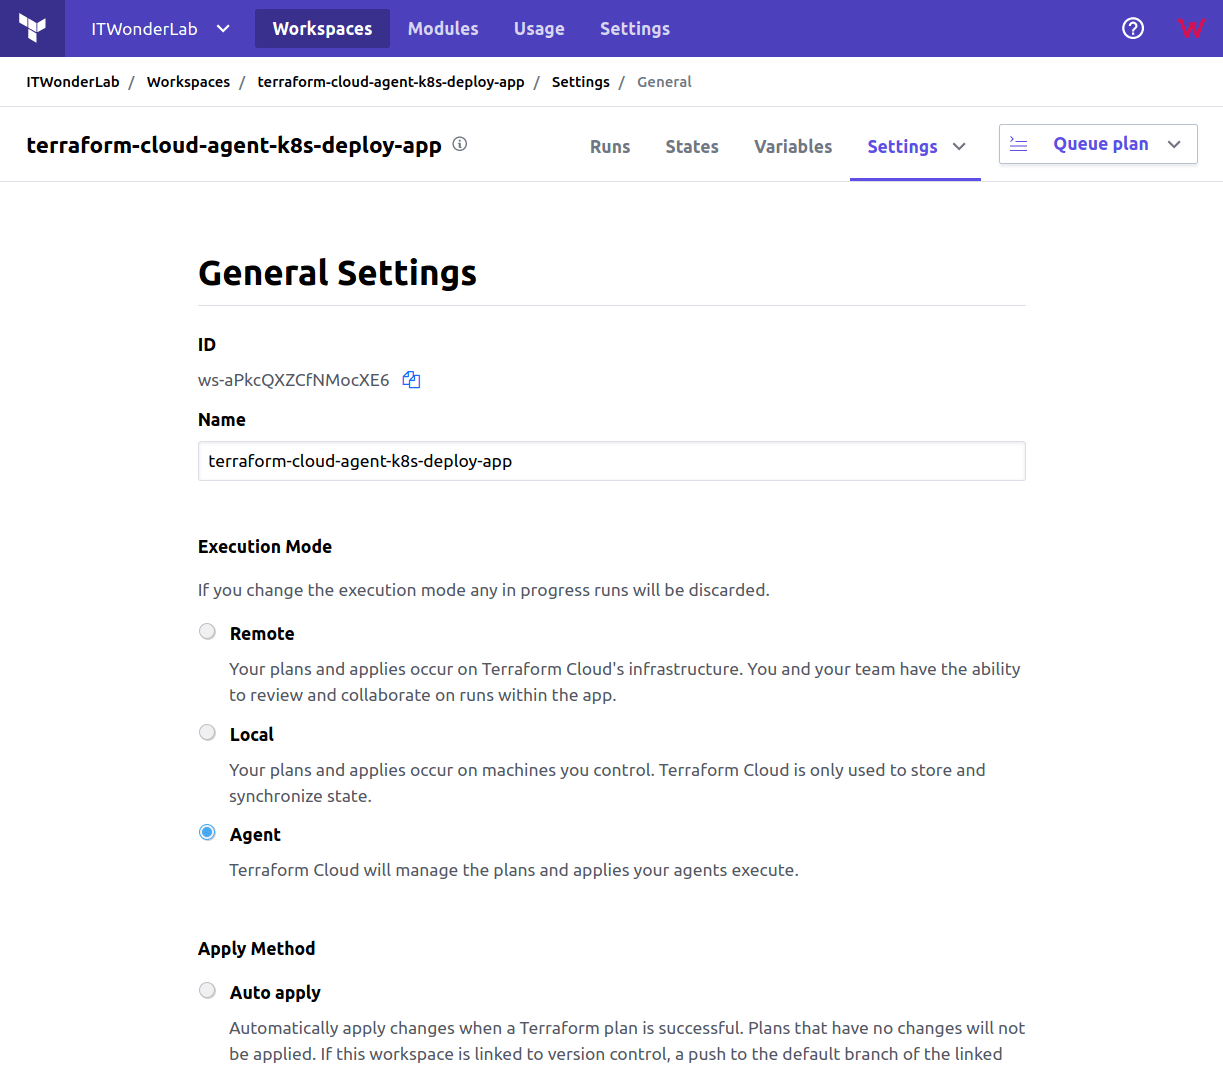
**Configure execution mode**
Go to Settings and select that this workspace uses an Agent and click Save Setting.
---
**Add the variables for the Workspace**
We will use Terraform Cloud Variables, a functionality that allows us to set the value of some variables in the workspace. This is a great way to remove sensitive values from the Terraform files and the corresponding VCS (GitHub).
**Go to Variables and add all the PEM-encoded certificates**
In the Variables page of Terraform Cloud add the following variables and their PEM encoded values from .kube/config file:
- cluster\_ca\_certificate: PEM encoded certificate in certificate-authority-data
- client\_certificate: PEM encoded certificate in client-certificate-data
- client\_key: PEM encoded certificate in client-key-data
Obtain the values by running the following code that extracts (`grep & awk`) and encodes (`base64 -d -i`) the certificates from the $HOME/.kube/config file:
```bash
$grep 'certificate-authority-data' $HOME/.kube/config | awk '{print $2}' | base64 -d -i
$grep 'client-certificate-data' $HOME/.kube/config | awk '{print $2}' | base64 -d -i
$grep 'client-key-data' $HOME/.kube/config | awk '{print $2}' | base64 -d -i
```
The values are multi-line values that need special treatment in Terraform using the shell-style “here doc” syntax.
Place the PEM Certificates between < master
```
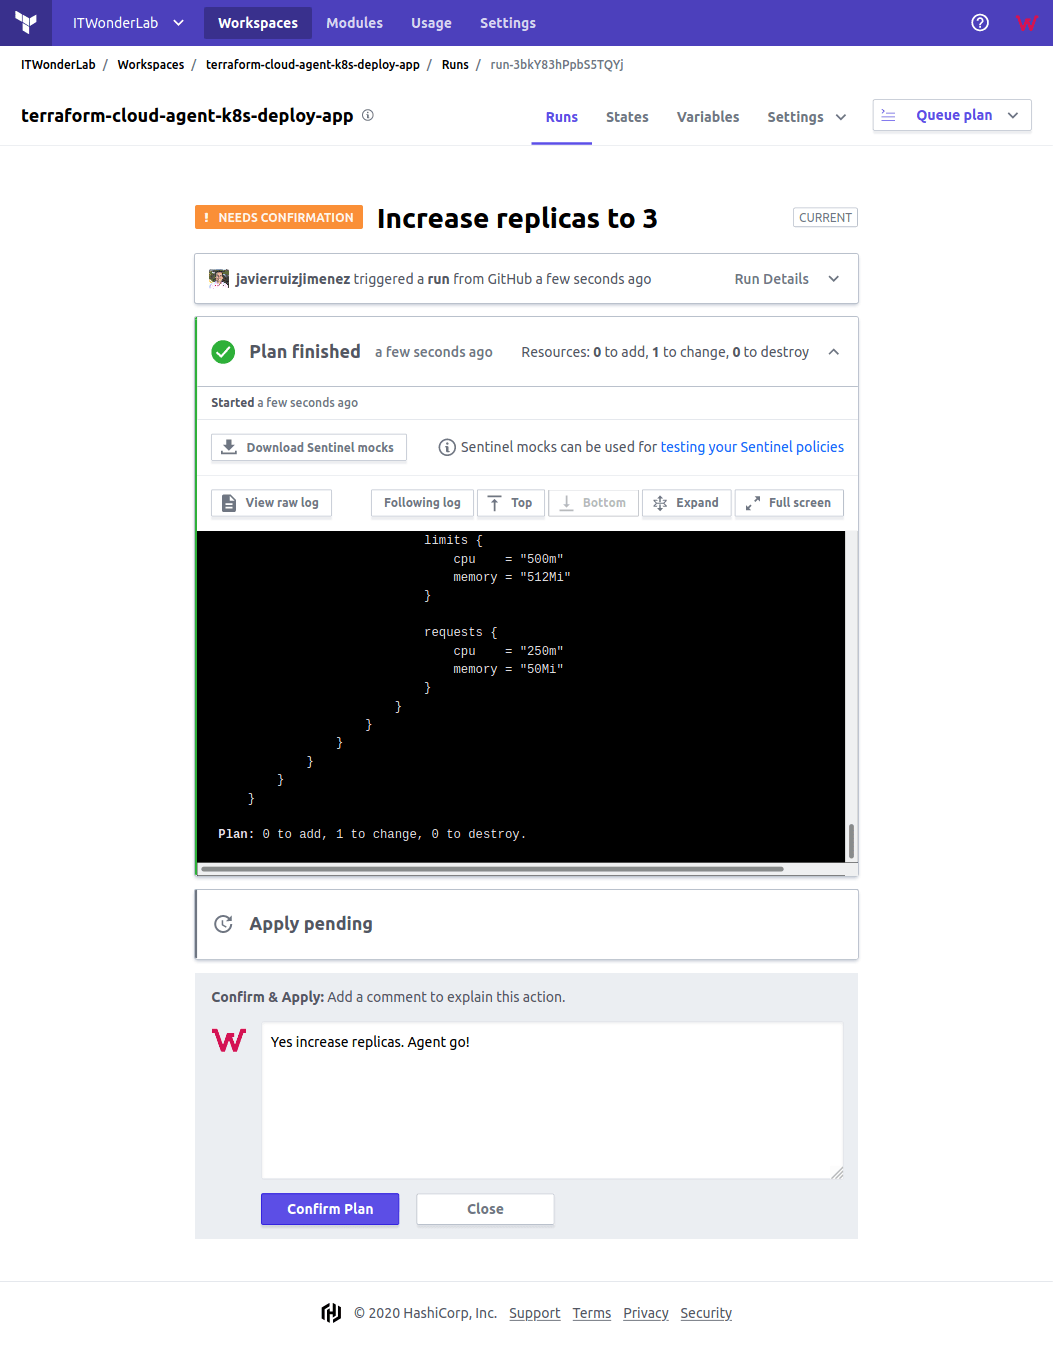
**Terraform plan is running**
Terraform Cloud shows a plan running triggered by a change in the VCS.
Confirm and Apply the change to continue.
---
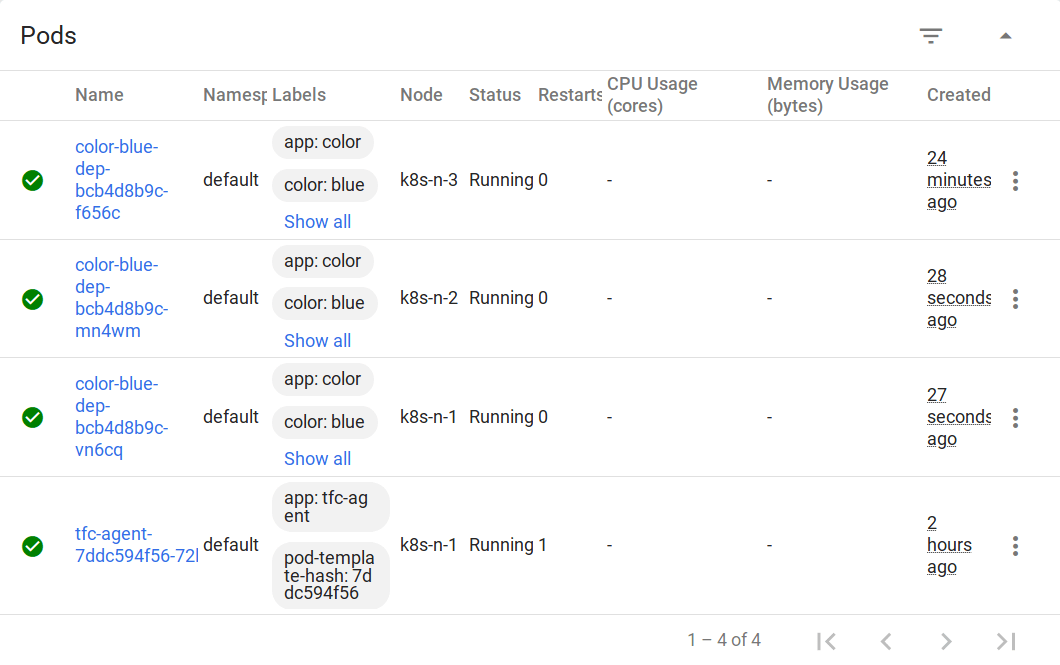
**Kubernetes dashboard shows 3 replicas**
Once the plan is confirmed, the agent applies the change that increases the number of replicas to 3 as shown on the Kubernetes Dashboard.
## Conclusion
Terraform Cloud Business with its remote agents and the advanced security and auditing functionality is recommended for companies that have used the Terraform free edition and now would like to roll out Terraform across the organization applying better practices and all the requirements that an enterprise software solution provides.
**Terraform Agents needed more functionality**: when this was written, the platform was not yet able to manage associations between agents and workspaces, something that had to be taken into account in enterprises with complex needs or multiple data centers. Take into account as well that moving to an enterprise offering requires **adjustments** in processes, software, support, and team experience.