Terraform is a great tool to programmatically define infrastructure (IaC or Infrastructure as Code) since Kubernetes Applications are containerized, its deployment can be done with a small Terraform configuration file that defines the resources that should be created in Kubernetes.
This tutorial shows how to publish an Application and create a NodePort in Kubernetes using Terraform. It only takes 10 seconds!
The application will be retrieved from the Docker Public Registry and Terraform will instruct Kubernetes to create 3 replicas and publish its services in a NodePort.
Updates:
See Publishing Containers in Kubernetes with OpenTofu for an updated tutorial using OpenTofu / Terraform and K3s.
How to deploy applications in Kubernetes using Terraform
Check Kubernetes Cluster Connection Context
Check the context file using the command kubectl config view.
Test Kubernetes Cluster Connectivity
Check Kubernetes Cluster Connectivity using the command kubectl get nodes.
Create a Terraform file for Application Deployment in Kubernetes
Use the Terraform Kubernetes provider and set the config_context to use. Define a kubernetes_deployment resource with the Kubernetes metadata, specs, and container (Docker) image.
Initialize Terraform Kubernetes Provider
Initialize the Terraform Providers (Terraform Kubernetes provider) with the terraform init command. It will download the required plugins.
Publish the Application In Kubernetes and its NodePort with Terraform
Run terraform plan and terraform apply to Publish the Application In Kubernetes and create a NodePort (if needed).
Use the Kubernetes Dashboard to Review the Deployment
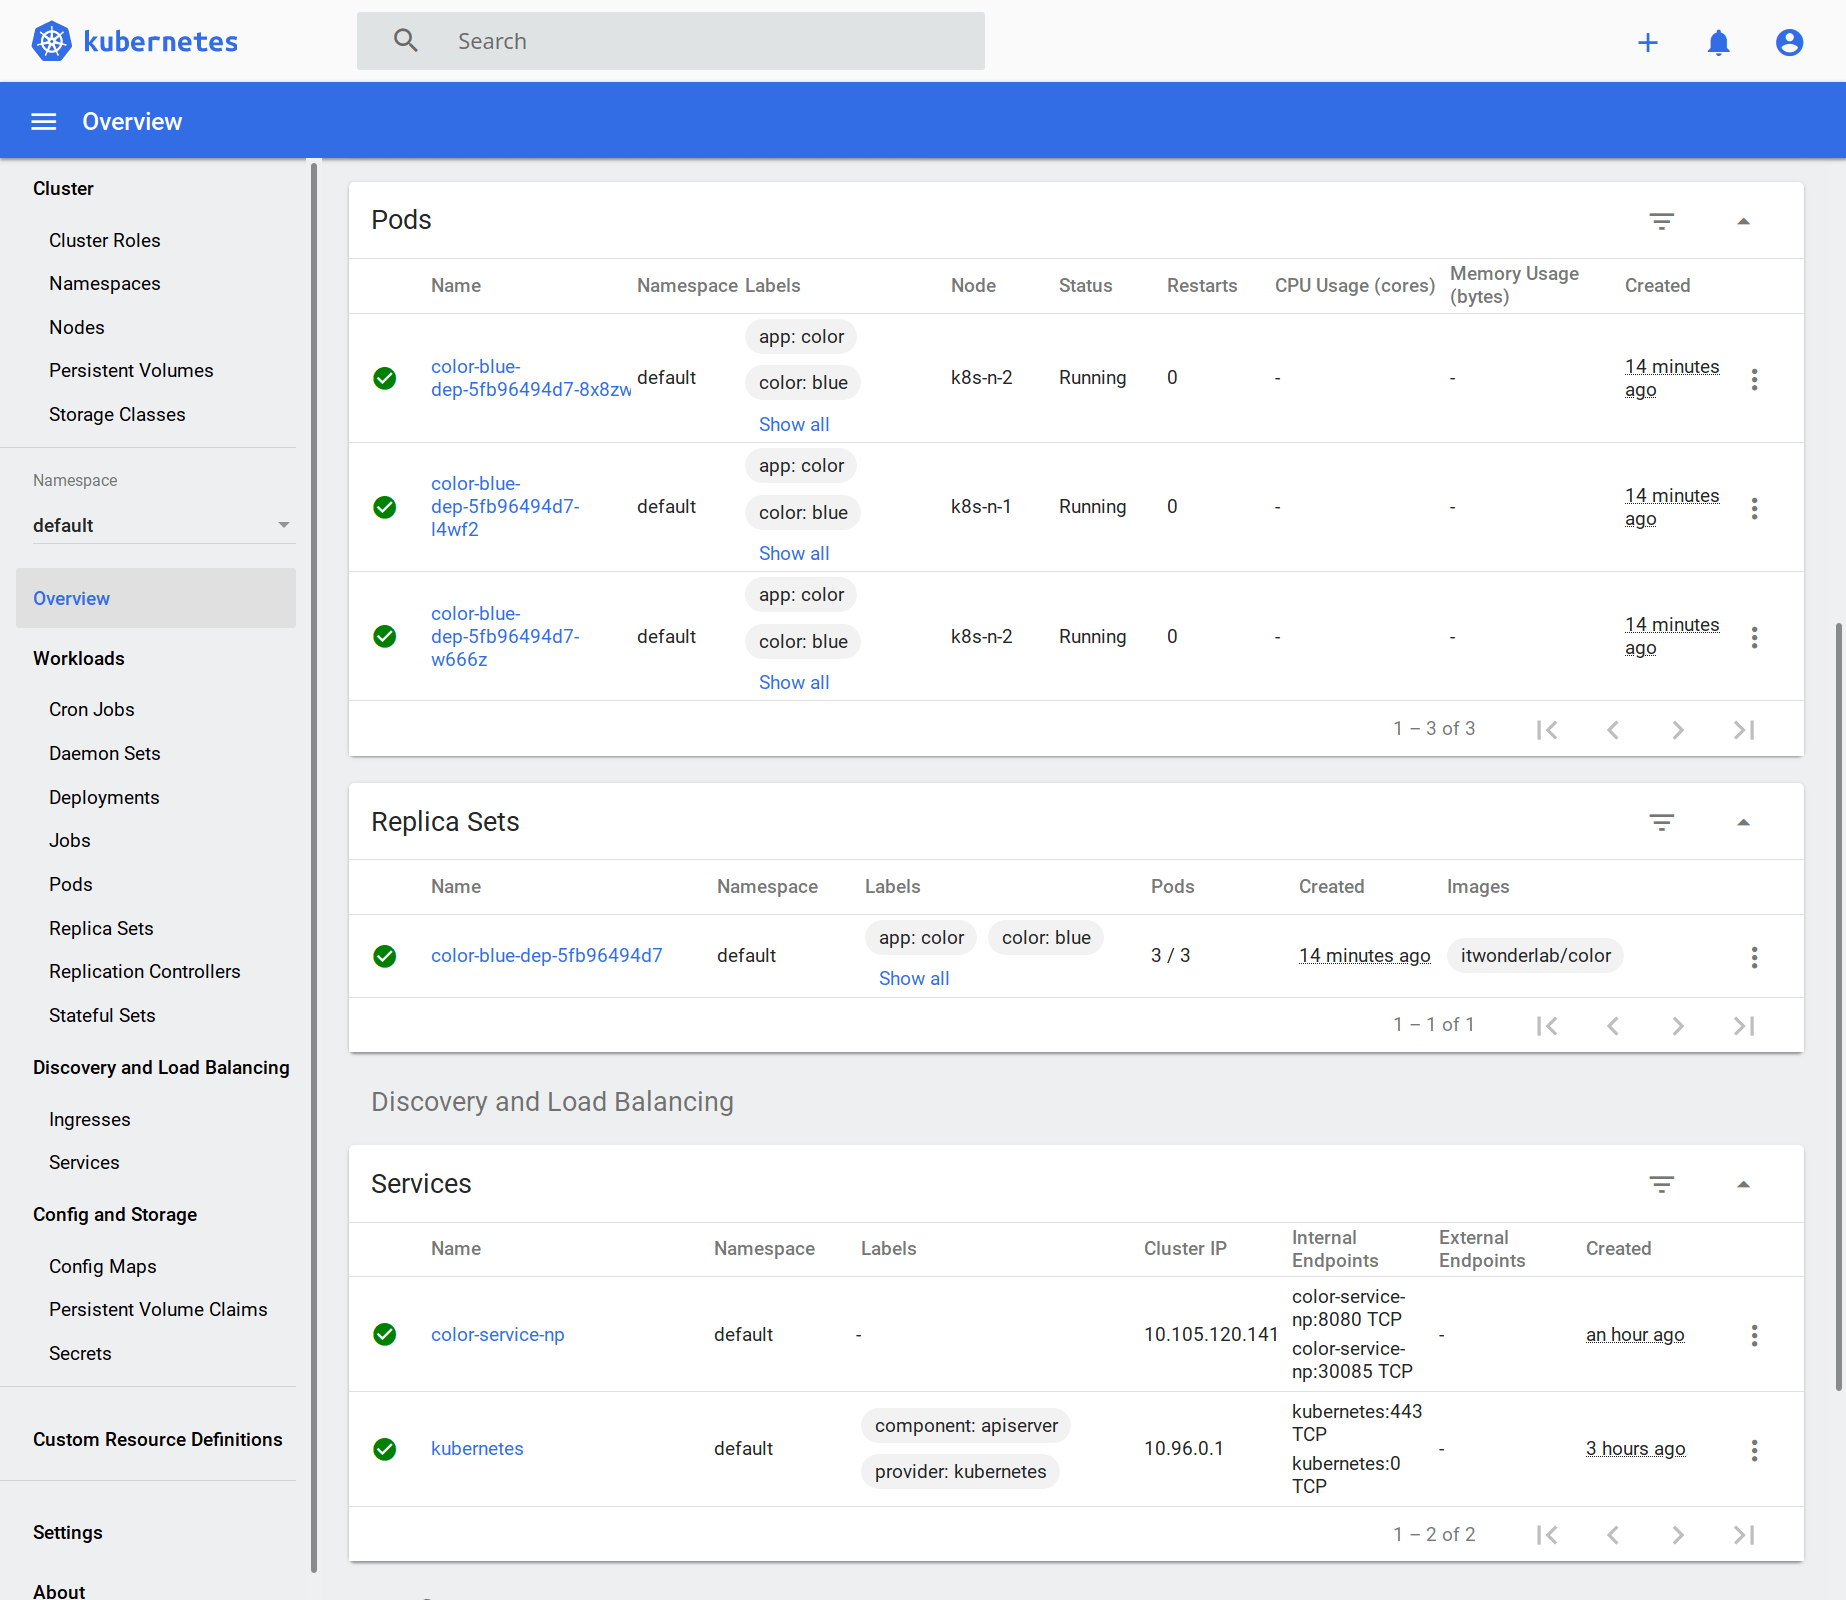
The Kubernetes Dashboard shows the number of replicas or PODS of the application and a Service with the NPort to access the application from outside the Kubernetes cluster.
This demo shows how Terraform is used to deploy an application image from the Docker Public Registry into Kubernetes.
Click the ► play button to see the asciinema demo:
For our example, we will use an existing Kubernetes cluster connection configuration available at the standard location ~/.kube/config
The ~/.kube/config file can have many different contexts, a context defines a cluster, a user, and a name for the context.
Check the context file using the command kubectl config view:
Zj7i2amef572KHsabWyPFnH0wSHhw80DJa3UMujA1mI3JyUYtCuqpeSceZTkNDyF3iNpcF79PrOFXfkCqLDKbZQQQ4tPGqfrxxvT7l5LSghyN1f0IjPYmARPlAbIQUisHk3clsuQOUDEA3W0gEjS2VlNh7uphTvQFh3Zj7i2amef572KHsabWyPFnH0wSHhw80DJa3UMujA1mI3JyUYtCuqpeSceZTkNDyF3iNpcF79PrOFXfkCqLDKbZQQQ4tPGqfrxxvT7l5LSghyN1f0IjPYmARPlAbIQUisHk3clsuQOUDEA3W0gEjS2VlNh7uphTvQFh3

$ kubectl config view
apiVersion: v1
clusters:
- cluster:
    certificate-authority-data: DATA+OMITTED
    server: https://192.168.50.11:6443
  name: kubernetes
contexts:
- context:
    cluster: kubernetes
    user: kubernetes-admin
  name: kubernetes-admin@ditwl-k8s-01
current-context: kubernetes-admin@ditwl-k8s-01
kind: Config
preferences: {}
users:
- name: kubernetes-admin
  user:
    client-certificate-data: REDACTED
    client-key-data: REDACTED</pre>
The context named kubernetes-admin@ditwl-k8s-01 is shown as it appears at ~/.kube/config file:
apiVersion: v1
clusters:
- cluster:
    certificate-authority-data: LS0tLS1CRUdJTiBDRVJUSUZJQ0FURS0tLS0tCk1JSUN5RENDQWJDZ0F3SUJBZ0lCQURBTkJna3Foa2lH....Q0VSVElGSUNBVEUtLS0tLQo=
    server: https://192.168.50.11:6443
  name: kubernetes
contexts:
- context:
    cluster: kubernetes
    user: kubernetes-admin
  name: kubernetes-admin@ditwl-k8s-01
current-context: kubernetes-admin@ditwl-k8s-01
kind: Config
preferences: {}
users:
- name: kubernetes-admin
  user:
    client-certificate-data: LS0tLS1CRUdJTiBDRVJUSUZJQ0FURS0tLS0tCk1JSUM4akNDQWRxZ0F3SUJBZ0lJWTJsaU5WWjVrZ1V3....U4rbW9qL1l6V0NJdURnSXZBRU1NZDVIMnBOaHMvcz0KLS0tLS1FTkQgQ0VSVElGSUNBVEUtLS0tLQo=
    client-key-data: LS0tLS1XRUdJTiBSU0EgUFJJVkFURSBLRVktLS0tLQpWSUlFcFFJQkFBS0NBUUVBK295RXBYVTZu.....BLRVktLS0tLQo=
We will use the context kubernetes-admin@ditwl-k8s-01 in our Terraform provider definition for Kubernetes.
If your context differs either update the Terraform file or rename the context using the commands:
kubectl config get-contexts
kubectl config rename-context
In the following example, an existing context named kubernetes-admin@kubernetes is renamed to kubernetes-admin@ditwl-k8s-01
$ kubectl config get-contexts
CURRENT   NAME                            CLUSTER      AUTHINFO           NAMESPACE
*         kubernetes-admin@kubernetes   kubernetes   kubernetes-admin
$ kubectl config rename-context kubernetes-admin@kubernetes kubernetes-admin@ditwl-k8s-01
Context "kubernetes-admin@kubernetes" renamed to "kubernetes-admin@ditwl-k8s-01".
$ kubectl config get-contexts
CURRENT   NAME                            CLUSTER      AUTHINFO           NAMESPACE
*         kubernetes-admin@ditwl-k8s-01   kubernetes   kubernetes-admin
Please make sure that your Kubernetes configuration file has the correct credentials by connecting to the cluster with the kubectl command.
jruiz@XPS13:~/git/github/terraform-kubernetes-deploy-app$ kubectl get nodes
NAME      STATUS   ROLES    AGE     VERSION
k8s-m-1   Ready    master   3h33m   v1.18.6
k8s-n-1   Ready    <none>   3h30m   v1.18.6
k8s-n-2   Ready    <none>   3h27m   v1.18.6
Create or download from GitHub the file terraform.tf:
# Copyright (C) 2018 - 2023 IT Wonder Lab (https://www.itwonderlab.com)
#
# This software may be modified and distributed under the terms
# of the MIT license.  See the LICENSE file for details.
# -------------------------------- WARNING --------------------------------
# IT Wonder Lab's best practices for infrastructure include modularizing
# Terraform configuration.
# In this example, we define everything in a single file.
# See other tutorials for Terraform best practices for Kubernetes deployments.
# -------------------------------- WARNING --------------------------------
terraform {
  required_version = "> 1.5"
}

#-----------------------------------------
# Default provider: Kubernetes
#-----------------------------------------
provider "kubernetes" {

  #kubeconfig file, if using K3S set the path
  #config_path = "/etc/rancher/k3s/k3s.yaml"

  #Context to choose from the config file. Change if not default.
  config_context = "kubernetes-admin@ditwl-k8s-01"
}


#-----------------------------------------
# KUBERNETES: Deploy App
#-----------------------------------------
resource "kubernetes_deployment" "color" {
    metadata {
        name = "color-blue-dep"
        labels = {
            app   = "color"
            color = "blue"
        } //labels
    } //metadata

    spec {
        selector {
            match_labels = {
                app   = "color"
                color = "blue"
            } //match_labels
        } //selector
        #Number of replicas
        replicas = 3
        #Template for the creation of the pod
        template {
            metadata {
                labels = {
                    app   = "color"
                    color = "blue"
                } //labels
            } //metadata
            spec {
                container {
                    image = "itwonderlab/color"   #Docker image name
                    name  = "color-blue"          #Name of the container specified as a DNS_LABEL. Each container in a pod must have a unique name (DNS_LABEL).

                    #Block of string name and value pairs to set in the container's environment
                    env {
                        name = "COLOR"
                        value = "blue"
                    } //env

                    #List of ports to expose from the container.
                    port {
                        container_port = 8080
                    }//port

                    resources {
                        requests = {
                            cpu    = "250m"
                            memory = "50Mi"
                        } //requests
                    } //resources
                } //container
            } //spec
        } //template
    } //spec
} //resource


#-------------------------------------------------
# KUBERNETES: Add a NodePort
#-------------------------------------------------

resource "kubernetes_service" "color-service-np" {
  metadata {
    name = "color-service-np"
  } //metadata
  spec {
    selector = {
      app = "color"
    } //selector
    session_affinity = "ClientIP"
    port {
      port      = 8080
      node_port = 30085
    } //port
    type = "NodePort"
  } //spec
} //resource
Lines 12 defines the required version for Terraform. We will be using Terraform 1.15 or above.
Lines 18 to 25 define the configuration for the Terraform Kubernetes provider
~/.kube/config file.Lines 31 to 83 define a Terraform Kubernetes deployment resource named color with the following properties:
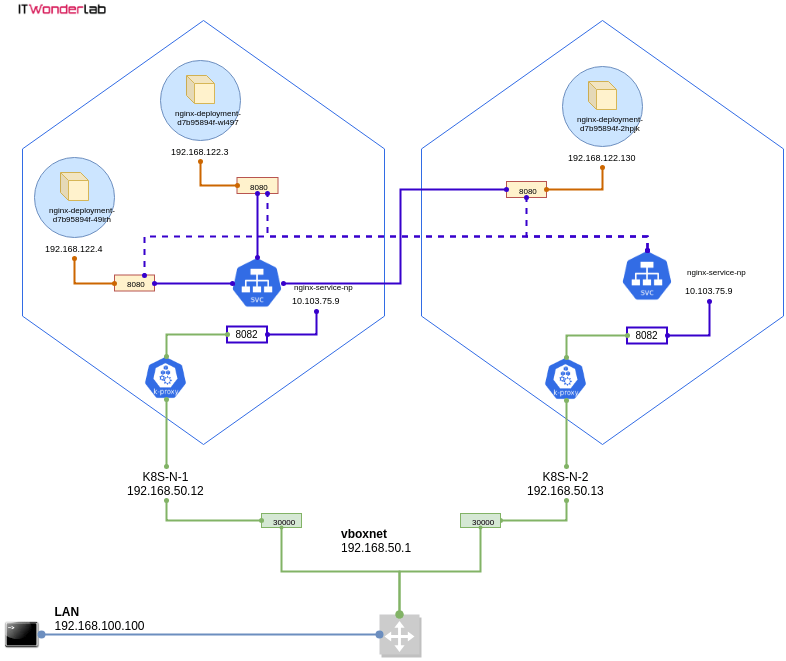
Since we use our Local Kubernetes Cluster using Vagrant and Ansible tutorial, a NodePort must be created to expose the application port outside the VirtualBox network.

Lines 91 to 106 create a NodePort that publishes app "color" port 8080 as Node Port 30085 in all Kubernetes nodes' public IPs. See Using a NodePort in a Kubernetes Cluster on top of VirtualBox for more information.
Initialize the Terraform Kubernetes Provider by running terraform init. It will download the required plugins. This step is needed when a new provider has been added to the Terraform plan.
$ terraform init

Initializing the backend...

Initializing provider plugins...
- Finding latest version of hashicorp/kubernetes...
- Installing hashicorp/kubernetes v2.23.0...
- Installed hashicorp/kubernetes v2.23.0 (signed by HashiCorp)

Terraform has created a lock file .terraform.lock.hcl to record the provider
selections it made above. Include this file in your version control repository
so that Terraform can guarantee to make the same selections by default when
you run "terraform init" in the future.
...
Publish the application by applying the Terraform plan.
Run terraform plan
$ terraform plan

Terraform used the selected providers to generate the following execution plan. Resource actions are indicated with the following symbols:
  + create

Terraform will perform the following actions:

  # kubernetes_deployment.color will be created
  + resource "kubernetes_deployment" "color" {
      + id               = (known after apply)
      + wait_for_rollout = true

      + metadata {
          + generation       = (known after apply)
          + labels           = {
              + "app"   = "color"
              + "color" = "blue"
            }
          + name             = "color-blue-dep"
          + namespace        = "default"
          + resource_version = (known after apply)
          + uid              = (known after apply)
        }

      + spec {
          + min_ready_seconds         = 0
          + paused                    = false
          + progress_deadline_seconds = 600
          + replicas                  = "3"
          + revision_history_limit    = 10

          + selector {
              + match_labels = {
                  + "app"   = "color"
                  + "color" = "blue"
                }
            }

          + template {
              + metadata {
                  + generation       = (known after apply)
                  + labels           = {
                      + "app"   = "color"
                      + "color" = "blue"
                    }
                  + name             = (known after apply)
                  + resource_version = (known after apply)
                  + uid              = (known after apply)
                }
              + spec {
                  + automount_service_account_token  = true
                  + dns_policy                       = "ClusterFirst"
                  + enable_service_links             = true
                  + host_ipc                         = false
                  + host_network                     = false
                  + host_pid                         = false
                  + hostname                         = (known after apply)
                  + node_name                        = (known after apply)
                  + restart_policy                   = "Always"
                  + scheduler_name                   = (known after apply)
                  + service_account_name             = (known after apply)
                  + share_process_namespace          = false
                  + termination_grace_period_seconds = 30

                  + container {
                      + image                      = "itwonderlab/color"
                      + image_pull_policy          = (known after apply)
                      + name                       = "color-blue"
                      + stdin                      = false
                      + stdin_once                 = false
                      + termination_message_path   = "/dev/termination-log"
                      + termination_message_policy = (known after apply)
                      + tty                        = false

                      + env {
                          + name  = "COLOR"
                          + value = "blue"
                        }

                      + port {
                          + container_port = 8080
                          + protocol       = "TCP"
                        }

                      + resources {
                          + limits   = (known after apply)
                          + requests = {
                              + "cpu"    = "250m"
                              + "memory" = "50Mi"
                            }
                        }
                    }
                }
            }
        }
    }

  # kubernetes_service.color-service-np will be created
  + resource "kubernetes_service" "color-service-np" {
      + id                     = (known after apply)
      + status                 = (known after apply)
      + wait_for_load_balancer = true

      + metadata {
          + generation       = (known after apply)
          + name             = "color-service-np"
          + namespace        = "default"
          + resource_version = (known after apply)
          + uid              = (known after apply)
        }

      + spec {
          + allocate_load_balancer_node_ports = true
          + cluster_ip                        = (known after apply)
          + cluster_ips                       = (known after apply)
          + external_traffic_policy           = (known after apply)
          + health_check_node_port            = (known after apply)
          + internal_traffic_policy           = (known after apply)
          + ip_families                       = (known after apply)
          + ip_family_policy                  = (known after apply)
          + publish_not_ready_addresses       = false
          + selector                          = {
              + "app" = "color"
            }
          + session_affinity                  = "ClientIP"
          + type                              = "NodePort"

          + port {
              + node_port   = 30085
              + port        = 8080
              + protocol    = "TCP"
              + target_port = (known after apply)
            }
        }
    }

Plan: 2 to add, 0 to change, 0 to destroy.
Run terraform apply to make the necessary changes in the Kubernetes cluster:
$ $ terraform apply

Terraform used the selected providers to generate the following execution plan. Resource actions are indicated with the following symbols:
  + create

Terraform will perform the following actions:

  # kubernetes_deployment.color will be created
  + resource "kubernetes_deployment" "color" {
      + id               = (known after apply)
      + wait_for_rollout = true

      + metadata {
          + generation       = (known after apply)
          + labels           = {
              + "app"   = "color"
              + "color" = "blue"
            }
          + name             = "color-blue-dep"
          + namespace        = "default"
          + resource_version = (known after apply)
          + uid              = (known after apply)
        }

      + spec {
          + min_ready_seconds         = 0
          + paused                    = false
          + progress_deadline_seconds = 600
          + replicas                  = "3"
          + revision_history_limit    = 10

          + selector {
              + match_labels = {
                  + "app"   = "color"
                  + "color" = "blue"
                }
            }

          + template {
              + metadata {
                  + generation       = (known after apply)
                  + labels           = {
                      + "app"   = "color"
                      + "color" = "blue"
                    }
                  + name             = (known after apply)
                  + resource_version = (known after apply)
                  + uid              = (known after apply)
                }
              + spec {
                  + automount_service_account_token  = true
                  + dns_policy                       = "ClusterFirst"
                  + enable_service_links             = true
                  + host_ipc                         = false
                  + host_network                     = false
                  + host_pid                         = false
                  + hostname                         = (known after apply)
                  + node_name                        = (known after apply)
                  + restart_policy                   = "Always"
                  + scheduler_name                   = (known after apply)
                  + service_account_name             = (known after apply)
                  + share_process_namespace          = false
                  + termination_grace_period_seconds = 30

                  + container {
                      + image                      = "itwonderlab/color"
                      + image_pull_policy          = (known after apply)
                      + name                       = "color-blue"
                      + stdin                      = false
                      + stdin_once                 = false
                      + termination_message_path   = "/dev/termination-log"
                      + termination_message_policy = (known after apply)
                      + tty                        = false

                      + env {
                          + name  = "COLOR"
                          + value = "blue"
                        }

                      + port {
                          + container_port = 8080
                          + protocol       = "TCP"
                        }

                      + resources {
                          + limits   = (known after apply)
                          + requests = {
                              + "cpu"    = "250m"
                              + "memory" = "50Mi"
                            }
                        }
                    }
                }
            }
        }
    }

  # kubernetes_service.color-service-np will be created
  + resource "kubernetes_service" "color-service-np" {
      + id                     = (known after apply)
      + status                 = (known after apply)
      + wait_for_load_balancer = true

      + metadata {
          + generation       = (known after apply)
          + name             = "color-service-np"
          + namespace        = "default"
          + resource_version = (known after apply)
          + uid              = (known after apply)
        }

      + spec {
          + allocate_load_balancer_node_ports = true
          + cluster_ip                        = (known after apply)
          + cluster_ips                       = (known after apply)
          + external_traffic_policy           = (known after apply)
          + health_check_node_port            = (known after apply)
          + internal_traffic_policy           = (known after apply)
          + ip_families                       = (known after apply)
          + ip_family_policy                  = (known after apply)
          + publish_not_ready_addresses       = false
          + selector                          = {
              + "app" = "color"
            }
          + session_affinity                  = "ClientIP"
          + type                              = "NodePort"

          + port {
              + node_port   = 30085
              + port        = 8080
              + protocol    = "TCP"
              + target_port = (known after apply)
            }
        }
    }

Plan: 2 to add, 0 to change, 0 to destroy.

Do you want to perform these actions?
  Terraform will perform the actions described above.
  Only 'yes' will be accepted to approve.

  Enter a value: yes

kubernetes_service.color-service-np: Creating...
kubernetes_deployment.color: Creating...
kubernetes_service.color-service-np: Creation complete after 0s [id=default/color-service-np]
kubernetes_deployment.color: Creation complete after 3s [id=default/color-blue-dep]

Apply complete! Resources: 2 added, 0 changed, 0 destroyed.
The application has been published.
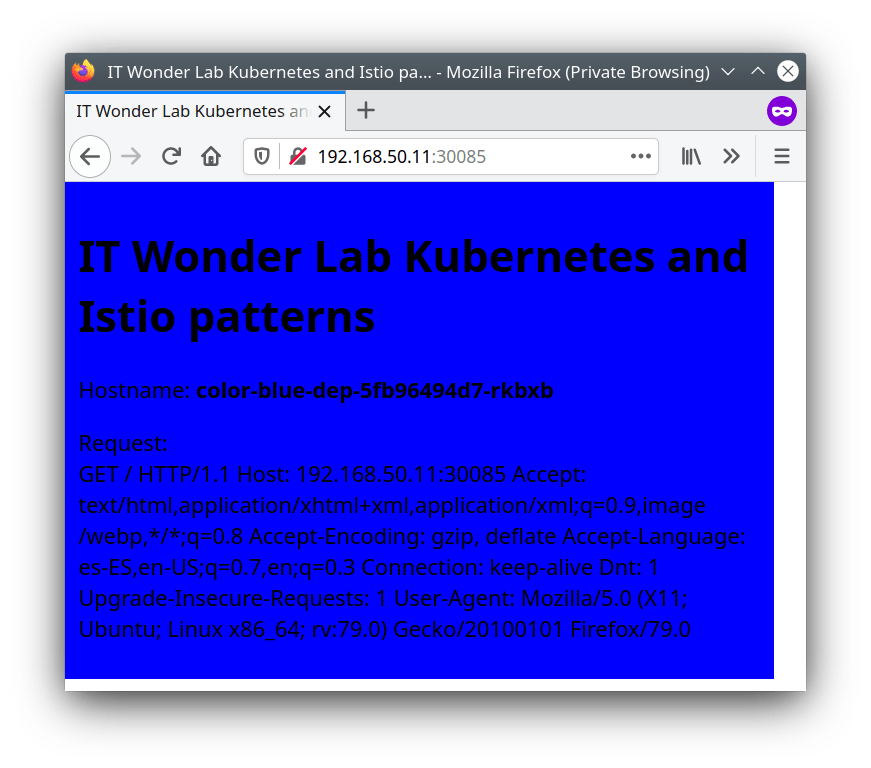
Open the URL http://192.168.50.11:30085/ to access the Color App (All Nodes in Kubernetes expose the same NodePort, you can use any of the Cluster IPs as explained in Using a NodePort in a Kubernetes Cluster on top of VirtualBox.

Now that you have accessed one of the Color App replicas, you can explore the changes that Terraform did in Kubernetes using the Kubernetes Dashboard, you can also modify the Terraform configuration, and apply changes to the deployed application.
If using the tutorial for a local Kubernetes cluster, access the Kubernetes Dashboard with the URL https://192.168.50.11:30002/

The Dashboard shows the 3 replicas or PODS of the application, a replica set that tells Kubernetes the number of PODs that it has to keep alive, and a Service with the NPort.
See how Terraform and Kubernetes modify the application number of replicas without disturbing existing connections by using a rolling update strategy.
Modify the terraform.tf file to change the number of replicas:
replicas = 1
Run terraform plan to see what will change:
$ terraform plan
kubernetes_service.color-service-np: Refreshing state... [id=default/color-service-np]
kubernetes_deployment.color: Refreshing state... [id=default/color-blue-dep]

Terraform used the selected providers to generate the following execution plan. Resource actions are indicated with the following symbols:
  ~ update in-place

Terraform will perform the following actions:

  # kubernetes_deployment.color will be updated in-place
  ~ resource "kubernetes_deployment" "color" {
        id               = "default/color-blue-dep"
        # (1 unchanged attribute hidden)

      ~ spec {
          ~ replicas                  = "3" -> "1"
            # (4 unchanged attributes hidden)

            # (3 unchanged blocks hidden)
        }

        # (1 unchanged block hidden)
    }

Plan: 0 to add, 1 to change, 0 to destroy.
Run terraform apply to make the change:
$ $ terraform apply
kubernetes_service.color-service-np: Refreshing state... [id=default/color-service-np]
kubernetes_deployment.color: Refreshing state... [id=default/color-blue-dep]

Terraform used the selected providers to generate the following execution plan. Resource actions are indicated with the following symbols:
  ~ update in-place

Terraform will perform the following actions:

  # kubernetes_deployment.color will be updated in-place
  ~ resource "kubernetes_deployment" "color" {
        id               = "default/color-blue-dep"
        # (1 unchanged attribute hidden)

      ~ spec {
          ~ replicas                  = "3" -> "1"
            # (4 unchanged attributes hidden)

            # (3 unchanged blocks hidden)
        }

        # (1 unchanged block hidden)
    }

Plan: 0 to add, 1 to change, 0 to destroy.

Do you want to perform these actions?
  Terraform will perform the actions described above.
  Only 'yes' will be accepted to approve.

  Enter a value: yes

kubernetes_deployment.color: Modifying... [id=default/color-blue-dep]
kubernetes_deployment.color: Modifications complete after 1s [id=default/color-blue-dep]

Apply complete! Resources: 0 added, 1 changed, 0 destroyed.
Terraform has instructed Kubernetes to change the number of replicas from 3 to 1, if you look at the dashboard or monitor the Kubernetes cluster during the change you will notice how Kubernetes applies a rolling update.
Check other Terraform Tutorials and Best Practices:

IT Wonder Lab tutorials are based on the diverse experience of Javier Ruiz, who founded and bootstrapped a SaaS company in the energy sector. His company, later acquired by a NASDAQ traded company, managed over €2 billion per year of electricity for prominent energy producers across Europe and America. Javier has over 25 years of experience in building and managing IT companies, developing cloud infrastructure, leading cross-functional teams, and transitioning his own company from on-premises, consulting, and custom software development to a successful SaaS model that scaled globally.