

Istio Patterns: Traffic Splitting in Kubernetes (Canary Release)
Canary Releases using Istio #
Tutorial on how to use Istio on Kubernetes for releasing new versions of software on the Cloud.
Istio can be used to distribute the traffic load using different rules, a popular procedure to introduce a new functionality in an application is to roll out the new release to a small number of users. This type of deployment is called a Canary release.
A small percentage of the user traffic will be sent to the new release, called the Canary Release. If everything works as expected, the Canary release will get more traffic and eventually all users will start using the new release. If something goes wrong, only a small percentage of users will be affected and the canary release can be removed without a major impact doing a rollback.
Deploying a Canary Release in Kubernetes Using Istio #
This example uses a deployment that shows a blue webpage and its new release that shows a green page. We want to send 75% of the users to the blue release (the old one) and 25% to the green release (the new one).
Istio has to be configured to accept HTTP traffic on the Kubernetes Ingress Gateway and send it to the Istio Gateway that will use an Istio Virtual Service to select the traffic with certain specifications (i.e. has a named header, is targeted to a named host or has a known path prefix). An Istio Destination Rule acts as a switch between different subsets of the application. Labels are used to link all the services and configuration.
Prerequisites #
Install Kubernetes #
See Building a Kubernetes Cluster with Vagrant and Ansible (without Minikube)
Install Istio #
See Installing Istio in Kubernetes under VirtualBox (without Minikube) for a tutorial on installing Istio in Kubernetes and publishing the Istio Gateway on VirtualBox as a requirement to apply this example.
Create the Color Application #
We will be using a small application written in Go as a deployment example to show some Istio Patterns. The application, called Color, shows a web page with a solid background color that depends on the value of an environment variable configured on the Kubernetes deployment file. It will also display information about the pod and the request.
You can download the source code from IT Wonder Lab git repository, build the application, and create your own Docker image, or use a prebuilt image from the IT Wonder Lab Docker public repository.
Building the Color Application #
Download the source code or create the following structure in your GOPATH (with current Go versions, a Go module with go mod init replaces the GOPATH layout):
$GOPATH/src/github.com/ITWonderLab/istio-patterns/
├── color
│ ├── color-blue.yaml
│ ├── color-green.yaml
│ ├── color-nodeport.yaml
│ ├── Dockerfile
│ ├── main.go
│ ├── publish.sh
│ └── response.html
├── color-istio-gw-canary-pct.yaml
└── LICENSE
The go application Color is made up of a main.go file with the code needed to start an HTTP server in port 8080 and render the template file response.html replacing some placeholders (Title, Color, Host Name and Requests). It also sets a cookie on the client with the value of the color (it will be used in other examples).
The YAML files are used for deployment in Kubernetes.
color-blue.yaml and color-green.yaml use the same container itwonderlab/color, the difference between the two deployments is:
- Value of the environment variable COLOR that is used by the Go app to set the background of the web page.
- Value of the label color, that is used by Kubernetes to identify and differentiate the green and blue deployments.
..apiVersion: apps/v1
kind: Deployment
metadata:
  name: dep-color-blue
  labels: #Labels for de deployment app: color and color: blue
    app: color
    color: blue
spec:
  selector:
    matchLabels:  #Deploy in a POD that has labels app: color and color: blue
      app: color
      color: blue
  replicas: 1
  template: #For the creation of the pod
    metadata:
      labels: #Tag the POD with labels app: color and color: blue
        app: color
        color: blue
    spec:
      containers:
        - name: color-blue
          image: itwonderlab/color
          env:
          - name: COLOR
            value: "blue"
          ports:
            - name: http2-web
              containerPort: 8080
color-nodeport.yaml is a Kubernetes deployment of a traditional Kubernetes Node Port service. This is the “traditional” way of publishing an application with Kubernetes when Istio is not available.
The Node Port publishes the app color (not making any difference between blue and green) in external port 30085:
apiVersion: v1
kind: Service
metadata:
  name: color-service-np
spec:
  type: NodePort
  selector:
    app: color
  ports:
    - name: http
      port: 8080        # Cluster IP http://10.109.199.234:port (docker exposed port)
      nodePort: 30085   # (EXTERNAL-IP VirtualBox IPs) http://192.168.50.11:nodePort/ http://192.168.50.12:nodePort/ http://192.168.50.13:nodePort/
      protocol: TCP

# i.e. http://192.168.50.11:30085/
Compiling the Color Application #
If you want to build your Color Application, you can run it locally by executing:
go run main.goAnd accessing the webpage http://localhost:8080/
or build and publish the Docker image with:
docker build . -t your_docker_repo/color
docker push your_docker_repo/color
The Docker image is built using the instructions of Dockerfile:
FROM golang as builder

WORKDIR /go/src/color

COPY . /go/src/color

RUN go get .

RUN CGO_ENABLED=0 GOOS=linux GOARCH=amd64 go build -a -o /main .

FROM alpine:latest

COPY --from=builder /main ./
COPY --from=builder /go/src/color/response.html ./

ENTRYPOINT ["./main"]

EXPOSE 8080
The Dockerfile uses two different Docker images golang and alpine in a multi-stage build intended to reduce the size of the final image (the Color application) to only 15.3 MB.
If you are using your own Private Docker repository, remember to set the correct Docker repository name by replacing all references to itwonderlab/color with your_docker_repo/color. See Annex: Using a private Docker Repository in Kubernetes.
Deploying the Application in Kubernetes #
Deploy the applications and the NodePort by running:
kubectl apply -f color-blue.yaml
kubectl apply -f color-green.yaml
kubectl apply -f color-nodeport.yaml
Test the application accessing a cluster IP and the assigned NodePort, example:
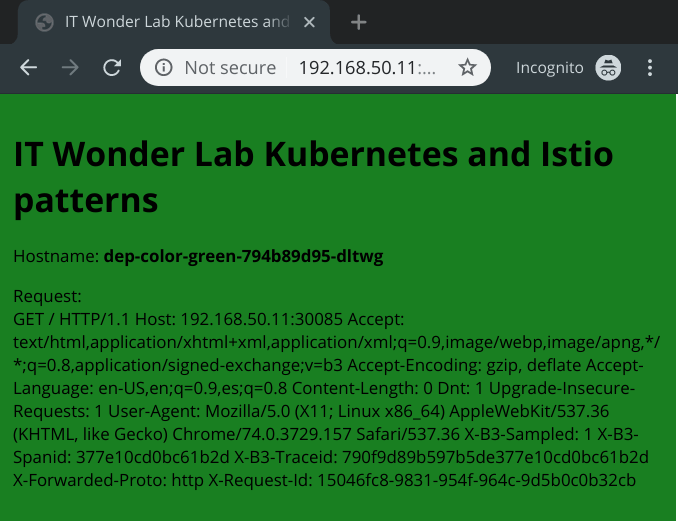
The Color App webpage is displayed with either green or blue background color. If you open another browser the color could change as Kubernetes redirects the request to a different deployment.
By using Istio we will be able to control the behavior of Kubernetes and use rules and weight to select the version (or color) of the application that is shown for each request.
Istio Definition for a Canary Deployment #
The color-istio-gw-canary-pct.yaml defines 4 resources to accomplish an Istio Canary Deployment of the green version of the Color application:
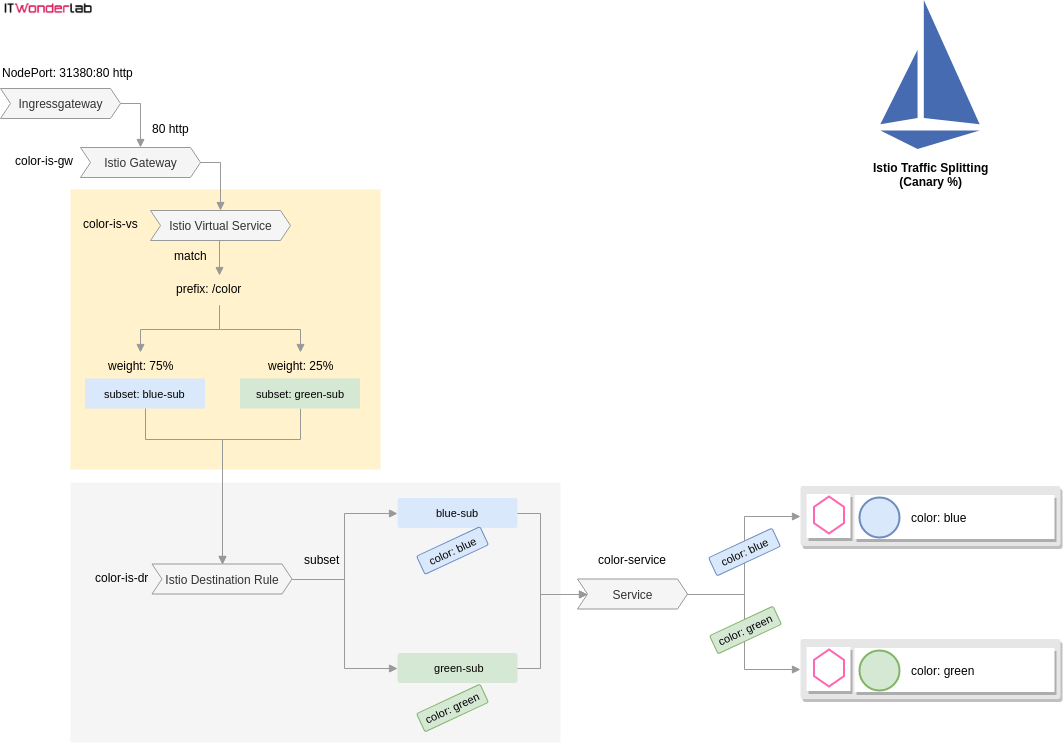
- Istio Gateway (networking.istio.io/v1alpha3 Gateway): uses the existing ingressgateway created when Istio was deployed to accept HTTP traffic at port 80 from any host (*).
- Istio Virtual Service (networking.istio.io/v1alpha3 VirtualService): the Istio virtual service is used to:
- Match traffic: HTTP with any host header, represented with * and with the URI prefix /color
- Route traffic:
- To the destination service (in Istio is named host) color-service and subset named blue-sub with a weight of 75%.
- To the destination service (in Istio is named host) color-service and subset named green-sub with a weight of 25%.
- Istio Destination Rule (networking.istio.io/v1alpha3 DestinationRule): defines subsets of a known service, in our example defines two subsets of the color-service service or host (in Istio, the services are called host):
- blue-sub: corresponds to the service color-service with label color equal to blue.
- green-sub: corresponds to the service color-service with label color equal to green.
- Kubernetes Service color-service: creates a cluster service named “color-service“, that receives traffic at port 8000 and sends it to port 8080 of the containers (the port exposed by the Docker images of the Color Application). The Istio Destination Rule will make sure that this Service sends 75% of the requests to the application color with label color: blue and 25% to the application color with label color: green.
apiVersion: networking.istio.io/v1alpha3
kind: Gateway
metadata:
  name: color-is-gw
spec:
  selector:
    istio: ingressgateway # use istio default controller
  servers:
  - port:
      number: 80
      name: http
      protocol: HTTP
    hosts:
    - "*"
---
apiVersion: v1
kind: Service
metadata:
  name: color-service
  labels:
    app: color
spec:
  ports:
  - name: http
    port: 8000
    targetPort: 8080 #Port in containers
  selector:
    app: color
---
apiVersion: networking.istio.io/v1alpha3
kind: DestinationRule
metadata:
  name: color-is-dr
spec:
  host: color-service
  subsets:
  - name: blue-sub
    labels:
      color: blue
  - name: green-sub
    labels:
      color: green
---
apiVersion: networking.istio.io/v1alpha3
kind: VirtualService
metadata:
  name: color-is-vs
spec:
  hosts:
  - "*"
  gateways:
  - color-is-gw
  http:
  - match:
    - uri:
        prefix: /color
    route:
    - destination:
        host: color-service #Name of the service
        subset: blue-sub
      weight: 75
    - destination:
        host: color-service #Name of the service
        subset: green-sub
      weight: 25
Create the objects in the Kubernetes Cluster with:
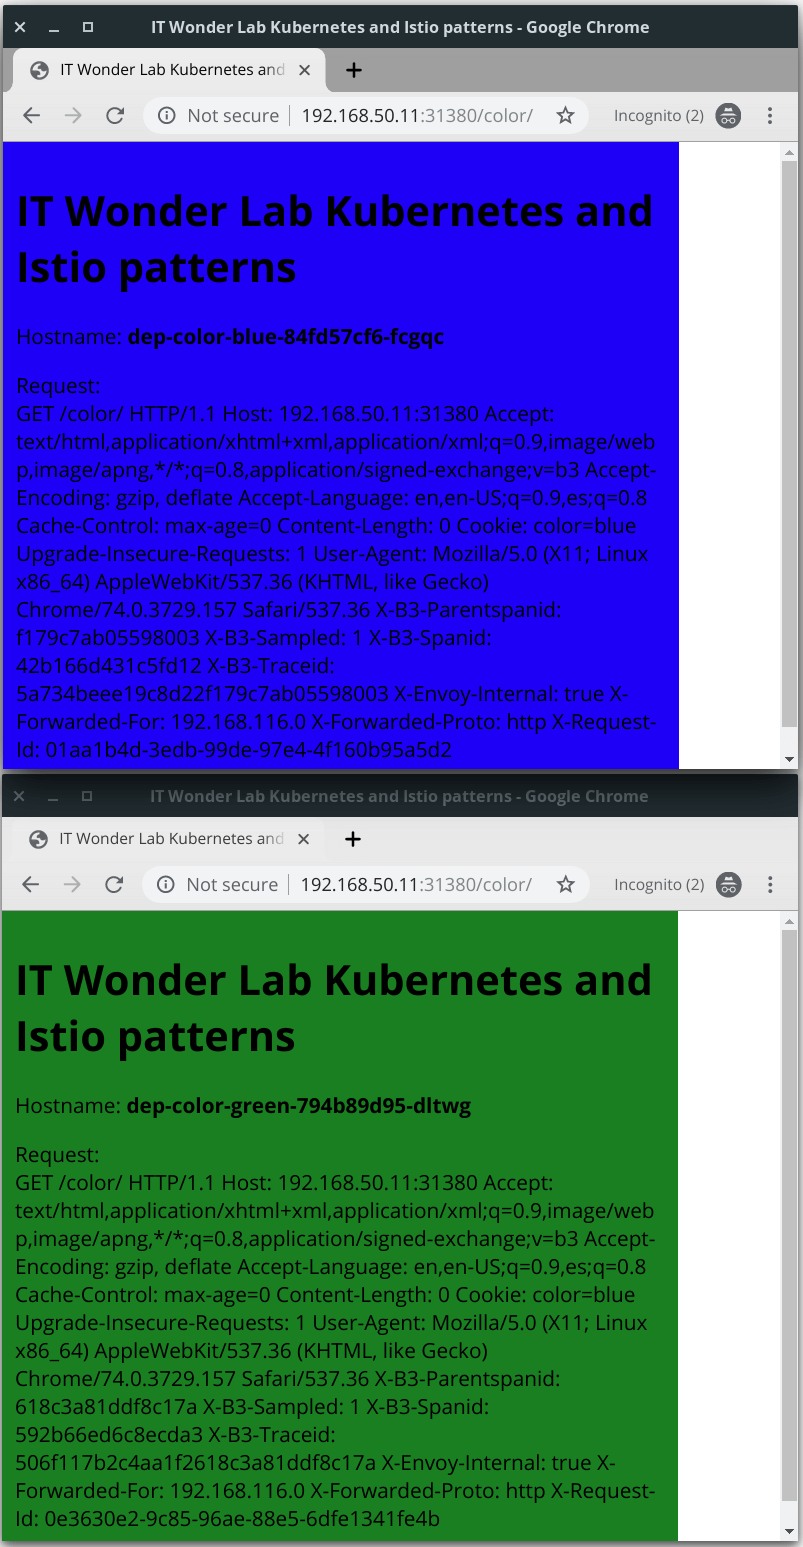
jruiz@XPS13:~/../istio-patterns$ kubectl apply -f color-istio-gw-canary-pct.yamlOpen a browser and visit URL http://192.168.50.11:30085/color/
The background of the page will be blue 75% of the times and green 25%.
Istio Canary Release Rollback #
Imagine that the Canary release is wrong and we need to roll back the change, simply change the weight of subset blue to 100 and subset green to 0:
....
    - destination:
        host: color-service #Name of the service
        subset: blue-sub
      weight: 100
    - destination:
        host: color-service #Name of the service
        subset: green-sub
      weight: 0
Apply the change in Kubernetes, reload the URL many times and see that green (the Canary release) is never shown.
Istio Canary Release to Production #
Imagine now that the Canary release is perfect and we want to send all users to the new release of the application. Change the weight of subset green to 100 and subset blue to 0:
....
    - destination:
        host: color-service #Name of the service
        subset: blue-sub
      weight: 0
    - destination:
        host: color-service #Name of the service
        subset: green-sub
      weight: 100
Apply the change in Kubernetes, reload the URL many times and see that green (the Canary release that now is in production) is the new color for all requests.
Annex: Using a private Docker Repository in Kubernetes #
The Docker images have to be available in the official public Docker Registry.
If using a local Docker image, it first needs to be uploaded to the public registry or a private registry.
If using a private registry like GitLab Container Registry or GitHub Packages you need to create Kubernetes secret with the Registry authentication information (Docker username and password) and include the full path to the image and the repository secret to use in the container section of the deployment descriptor.
See Kubernetes help page Pull an Image from a Private Registry for detailed instructions.
Related tutorials
- Kubernetes Tutorials
Installing Istio on Kubernetes
How to install Istio in a Kubernetes Cluster to use it as a service mesh for a microservices architecture.
- Kubernetes Tutorials
Istio Patterns: Traffic Splitting in Kubernetes (Header/Cookie Based)
How to split traffic in Kubernetes with Istio based on request headers, tutorial, and examples with source code.
 Networking and Delivery
Istio
Istio is an open source service mesh for Kubernetes that adds traffic routing, security and observability between services without changing the code.