

AWS with Terraform Tutorial: AWS AMIs (11)
How to find and select AWS AMIs with Terraform #
How to use the Terraform aws_ami data source block to find AWS AMIs to be used as EC2 templates (root volume snapshot with operating system and applications).
Welcome to our tutorial series where we dive into cloud infrastructure deployment using Terraform or OpenTofu on AWS. In this series, the fundamentals are shown, guiding you through the process of minimizing resource usage and simplifying the deployment complexities associated with cloud infrastructure.
This comprehensive OpenTofu and Terraform tutorial guides you step-by-step through creating infrastructure in AWS using Terraform.
Infrastructure as Code (IaC) helps maintain consistency, enables version control, enhances collaboration among teams, allows for easier replication of environments, streamlines the deployment and management of infrastructure boosting efficiency, and reducing errors in managing complex systems.
Prerequisites #
Read the previous sections of the tutorial, listed in the series index at the end of this page.
AWS AMI #
An Amazon Machine Image (AMI) is essentially a template that contains all the necessary information to launch a virtual machine (EC2 instance) within the AWS cloud environment.
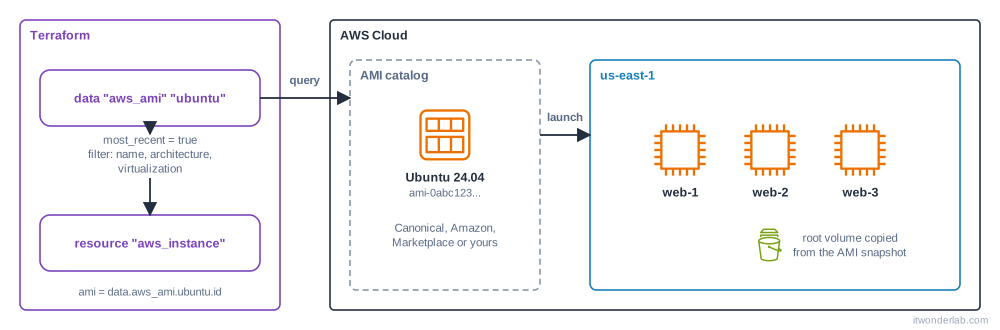
AWS has an AMI library composed of private AMI (only available for its owners) and an extensive selection of public Machine Images provided by AWS and the community. Public AMIs are available for most distributions of Linux.
Each AMI has an associated ID that is unique to each AWS Region. To enable Region portability for Terraform plans the AMI ID should not be used and instead a Terraform data source should be called to find out the corresponding AMI ID for a set of filters describing the AMI.
How to find an AWS AMI with Terraform #
Previous sections of this AWS with Terraform guide have covered basic information about Terraform and AWS and have configured and used the AWS Terraform provider to create a VPC, four subnets, one Internet Gateway, two NAT Gateways, three Routing Tables, Security Groups, and a Private Key.
The Terraform data source data "aws_ami" is used to get the ID of a registered AMI. The data source accepts a set of parameters and filters to select the AMI.
- owners
- most_recent
- filters:
- ARN of the AMI
- Architecture
- Boot Mode
- Block Device Mappings
- Hypervisor
- Image Type
- Name
- Tags
- …
For our needs, we will specify the name of the Image, the virtualization type, and the owner (Canonical). The owner doesn’t change across regions.
The value for the filters is extracted from the AWS AMI Catalog.
- Access the catalog by navigating to AWS Console: EC2 – AMI Catalog,
- Select Community AMIs,
- Mark Verified provider,
- Search for “Ubuntu Minimal” or for the image that interests you.

- Take note of the following fields to use them in the data source:
- name: ubuntu-minimal/images/hvm-ssd/ubuntu-lunar-23.04-arm64-minimal-20230607 (the number 20230607, at the end of the name, is the AMI release number, it should be replaced by the symbol * to have Terraform find the latest AMI release.)
- owner: 099720109477
The Terraform AMI data source filter accepts an * as a wildcard and when used with the most_recent = true setting returns the latest AMI.
Add the following block to the terraform-aws-tutorial.tf created in previous sections.
#Find AMI Ubuntu 23.04 ARM64 Minimal
data "aws_ami" "ubuntu-23-04-arm64-minimal" {
  most_recent = true

  filter {
    name   = "name"
    values = ["ubuntu-minimal/images/hvm-ssd/ubuntu-lunar-23.04-arm64-minimal-*"]
  }

  filter {
    name   = "virtualization-type"
    values = ["hvm"]
  }

  owners = ["099720109477"] # Canonical
}
The returned value of a Terraform data source can be accessed using its type, name, and property: data.aws_ami.ubuntu-23-04-arm64-minimal.id or printed out and stored in the state file using a Terraform output (optional):
# Store the AMI ID - optional
output "aws-ami-ubuntu-23-04-arm64-minimal-id" {
  value = data.aws_ami.ubuntu-23-04-arm64-minimal.id
}
Run the Terraform Plan #
Open a command line shell in the directory where the file terraform-aws-tutorial.tf is located, and run the Terraform or OpenTofu plan and apply commands.
Plan using OpenTofu #
Run tofu plan to generate and review the execution plan. Check each line and value to make sure that it corresponds to the desired change.
Terraform will refresh the state comparing it with the Cloud resources and produce a plan for the resources that need to be created, updated, or destroyed.
In the previous section of the tutorial, some resources were commented out to reduce the infrastructure cost during development, as the AMI doesn’t have any dependencies with the commented code, there is no need to uncomment.
Run the Terraform plan:
$ tofu plan
data.aws_ami.ubuntu-23-04-arm64-minimal: Reading...
data.aws_ami.ubuntu-23-04-arm64-minimal: Read complete after 2s [id=ami-01eba98c26f317c58]

Changes to Outputs:
  + aws-ami-ubuntu-23-04-arm64-minimal-id = "ami-01eba98c26f317c58"
Apply the changes using OpenTofu #
There is no need to apply. Terraform data sources don’t produce any change in the infrastructure and are only used to access existing cloud resources.
In this case, the ubuntu-23-04-arm64-minimal AMI is already available in the AWS AMI Registry and the data sources are used to get its ID (and other properties) and use it as a parameter for the EC2 instance definition in the next section of this tutorial.
AWS AMI Cost #
Most of the Community AMIs are free to use but be aware that some have a cost and make sure to check that the publisher (owner) is trusted. The selected AMI for Ubuntu is free to use but other images from Canonical named Ubuntu Pro have a cost.
Common Questions About AWS AMI #
How do I create a custom AMI? #
A custom AMI can be created in multiple forms:
- Launching a base AMI, applying changes to it (using SSH), cleaning, powering off, creating a Snapshot, and using it to create a new Custom AMI.
- Using AWS EC2 Image Builder
- Using Hashicorp Packer.
Can I share AMIs with other AWS accounts? #
Yes, you can share Amazon Machine Images (AMIs) with other AWS accounts. This can be done either publicly or privately, allowing specific AWS accounts to access the shared AMIs.
Use the AWS Console EC2 AMI to modify the permissions of an AMI.
How do I find and select the right AMI for my needs? #
The right AMI for your needs depends on the type of load, applications, operating system, and CPU Architecture your EC2 instances will run. Use the AWS AMI Catalog to find the right AMI or build it yourself.
What is the difference between public and private AMIs? #
- Public AMIs are available to anyone in the AWS community. They are typically created and shared by AWS, third-party vendors, or other users. Public AMIs can be freely accessed and used by any AWS account.
- Private AMIs are restricted to specific AWS accounts. Private AMIs are created and owned by individual AWS accounts and are not accessible to other AWS users unless explicit permissions are granted. Private AMIs are often used for proprietary software, customized configurations / golden images, or sensitive data that should not be shared publicly.
How do I update or patch an AMI? #
To update or patch an AMI:
- Launch an instance from the existing AMI: Start by launching an EC2 instance using the AMI that you want to update or patch.
- Connect to the instance: Once the instance is running, connect to it using SSH (for Linux instances) or RDP (for Windows instances).
- Install updates and patches: Use package managers (such as yum or apt) for Linux instances or Windows Update for Windows instances to install any available updates, security patches, or software updates.
- Customize configuration: If needed, make any additional configuration changes or updates to the instance to ensure it meets your requirements.
- Create a new AMI: After the instance has been updated and patched, stop the instance and create a new AMI from it. In the AWS Management Console, navigate to the EC2 service, select “Instances” from the sidebar, choose the instance, and then click “Actions” > “Image and templates” > “Create image”.
- Test the new AMI: Once the new AMI is created, launch a new EC2 instance using this AMI to ensure that it functions as expected and that all updates and patches have been successfully applied.
- Update Auto Scaling groups, launch configurations, or other resources: If necessary, update any Auto Scaling groups, launch configurations, or other AWS resources that use the old AMI to use the new AMI instead.
- Clean up: After verifying that the new AMI works correctly, you can delete the old AMI to avoid confusion and reduce storage costs.
Can I automate the deployment of instances using AMIs? #
Yes, AWS services like AWS CloudFormation, AWS Elastic Beanstalk, and Auto Scaling groups deploy instances based on existing AMIs, and AWS Systems Manager Automation can build them. Terraform, as in this example, also uses an AWS AMI to deploy EC2 instances (see the Auto Scaling tutorial).
What security considerations should I keep in mind when using AMIs? #
Consider several security best practices:
- Source of AMIs: Only use AMIs from trusted sources. Avoid using AMIs from unknown or untrusted sources, as they may contain malicious software or vulnerabilities.
- Regularly update AMIs: Ensure that your AMIs are regularly updated with the latest security patches and updates. Create a process to regularly update and patch your AMIs to protect against known vulnerabilities.
- Scan for vulnerabilities: Use vulnerability scanning tools to scan your AMIs for security vulnerabilities and weaknesses. Address any identified vulnerabilities to reduce the risk of security breaches.
- Minimize access: Follow the principle of least privilege and ensure that only authorized users have access to your AMIs. Use IAM (Identity and Access Management) policies to control access to AMIs and restrict permissions to only those who need them.
- Secure credentials: Ensure that sensitive information such as passwords, SSH keys, and API keys stored in your AMIs are securely managed and protected. Avoid hardcoding credentials in your AMIs and use secure storage solutions such as AWS Secrets Manager or the AWS Systems Manager Parameter Store.
- Encrypt data: Encrypt sensitive data stored on your AMIs using encryption mechanisms provided by AWS, such as AWS Key Management Service (KMS). Encrypting data helps protect it from unauthorized access and data breaches.
- Implement network security: Configure security groups and network ACLs (Access Control Lists) to control inbound and outbound traffic to your instances launched from AMIs. Limit access to only necessary ports and protocols to reduce the attack surface.
- Monitor and log activity: Enable logging and monitoring for your instances launched from AMIs to detect and respond to security incidents. Use AWS CloudWatch Logs and AWS CloudTrail to monitor and log activity, and set up alerts for suspicious behavior.
- Regularly review and audit: Regularly review and audit your AMIs, security configurations, and access controls to ensure compliance with security best practices and regulatory requirements. Make adjustments as necessary to address any security gaps or vulnerabilities.
How do I backup and restore AMIs? #
EC2 instances are the result of launching a server using an AMI. Backup and restore for EC2 and AMI follow different processes:
- An AMI can be copied to a different region.
- EC2 instance volumes (hard drives) can be snapshotted and their content copied to another region.
- AWS Backup allows for the creation and management of backup plans across all services.
Next Steps #
Continue with AWS EC2 Instances, or see the full series index.